For creators
Create your first course
Every step from an empty workspace to a course students can find and buy — start with the AI Course Builder or by hand, fill in the five editor tabs, and publish. Most teachers are live in 15 minutes.
Last updated Sep 28, 2026
A course goes through the same six steps however you start it: create it, fill in the basics, build the curriculum, set the price, decide who can get in, and publish. Everything before publishing is a draft — students see nothing until you say so, and you can change any of it afterwards.
1. Start a course
Go to Courses in your dashboard. On an empty workspace you get three choices; once you have courses, the same two buttons sit at the top right — AI Course Builder and Create Course.
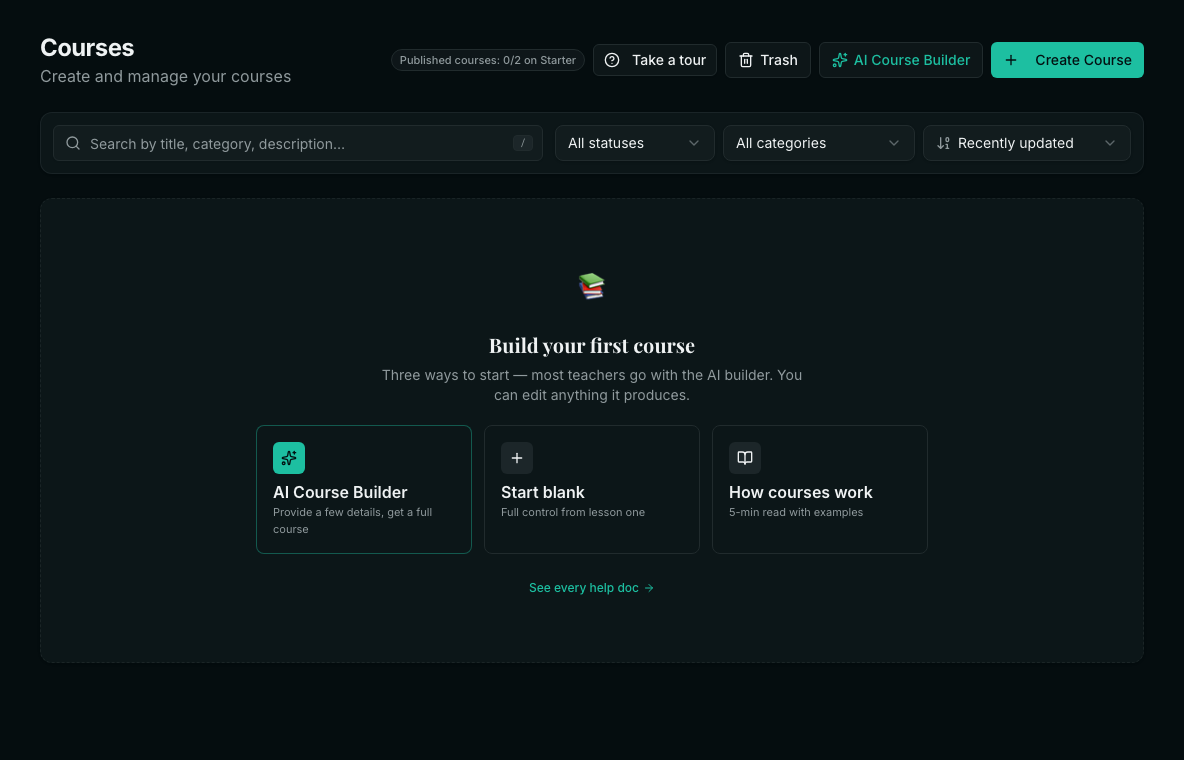
- AI Course Builder — describe the course and AI writes the outline and every lesson. Fastest way to a full first draft.
- Start blank (the Create Course button) — a short form, then you build the curriculum yourself. Best when you already have your material.
- How courses work — this article.
Option A: let AI build the course
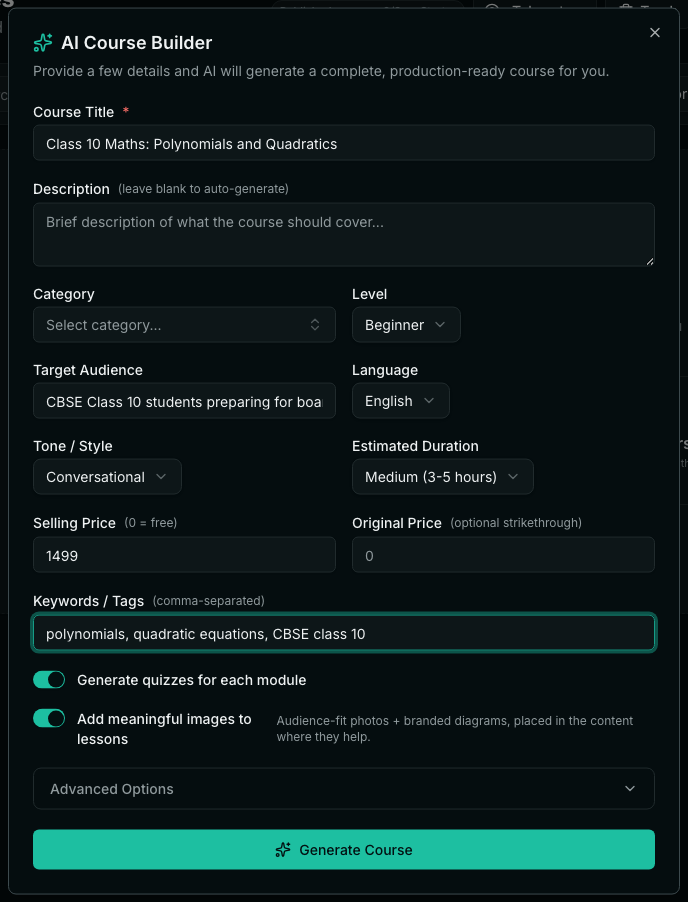
- Course Title — the only required field.
- Description — leave it blank and AI writes one.
- Category, Level, Language and Target Audience — who the course is for shapes the examples and the vocabulary.
- Tone / Style — Conversational, Formal / Academic, Practical / Hands-on, or Encouraging / Kids-friendly.
- Estimated Duration — Short (1–2 hours), Medium (3–5 hours) or Full (8–12 hours). This sets how many lessons it writes.
- Selling Price (0 = free) and Original Price for a strike-through.
- Keywords / Tags, plus Advanced Options → Custom Instructions for anything specific ("follow our state standards", "use everyday examples").
- Add meaningful images to lessons — on by default; places photos and diagrams where they help.
Click Generate Course. You'll see each stage as it runs — outline, course details, then every lesson one by one — and it takes a few minutes for a medium course. When it finishes you get a summary of modules, lessons and total duration. Click Create as Draft to save it; nothing is published.
Every plan includes AI generations with an hourly, daily and weekly allowance. If you've used them up, the dialog tells you exactly when you can generate again. If a generation fails, click Try Again — you'll need to re-enter the details.
Option B: build it yourself
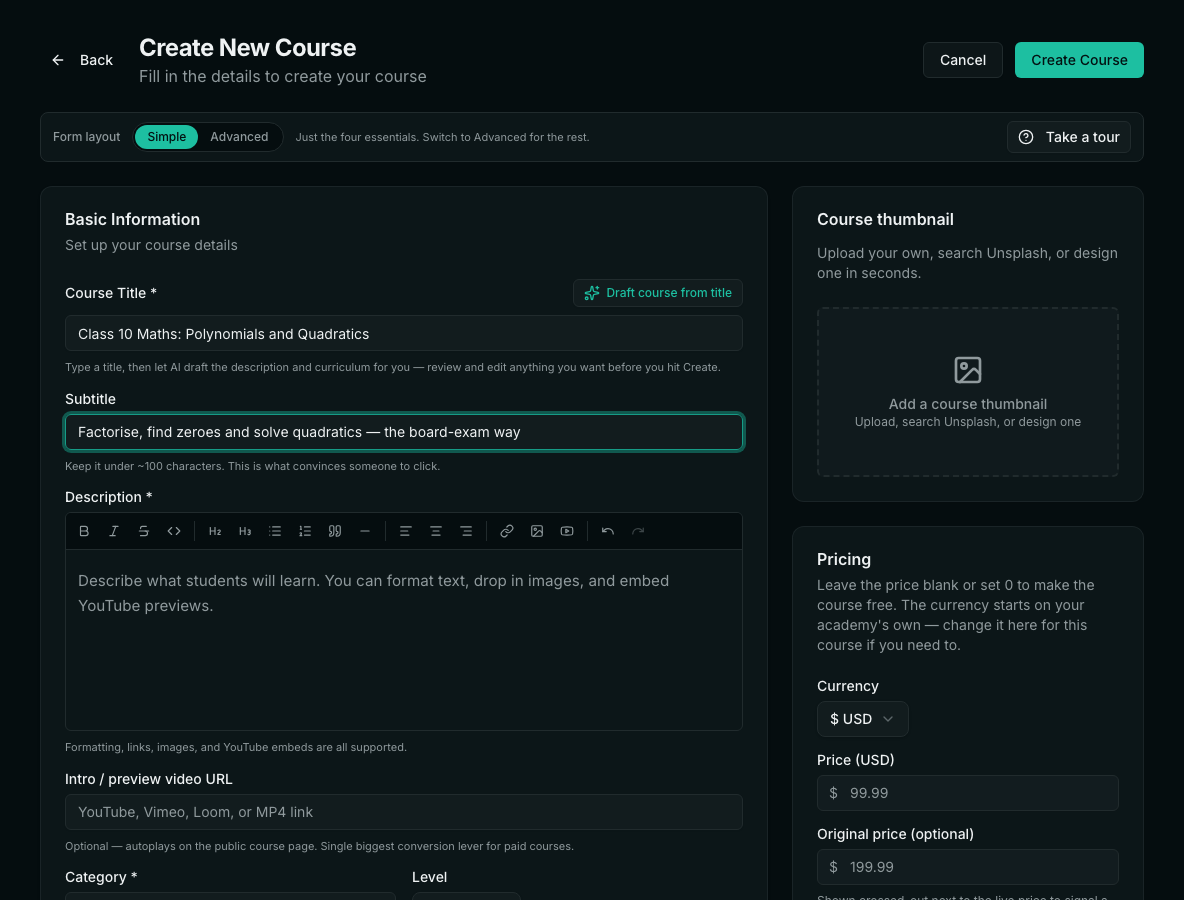
- Course Title — type it, then click Draft course from title if you want AI to suggest a description, subtitle and outline you can edit.
- Subtitle — one line under the title; this is what convinces someone to click.
- Description — your sales pitch. Text, images and YouTube embeds all work.
- Intro / preview video URL — YouTube, Vimeo, Loom or an MP4 link. It plays on your public course page.
- Category, Level and Language — how students find the course in your catalog.
- Course thumbnail — upload your own, search Unsplash, or design one.
- Pricing — leave the price blank for a free course. Original price shows crossed out next to it.
Click Create Course. Only the title is needed to create it — you can fill in the rest later. The course is saved as a draft and you land on its course page.
2. The course editor: Basics
Open the course and click Edit. The editor has five tabs — Basics, Curriculum, Pricing, Access and SEO — and a Summary on the right that updates as you work. Every change is autosaved as a draft ("Draft saved" under the title). Students keep seeing the last published version until you click Publish changes, so you can edit a live course safely.
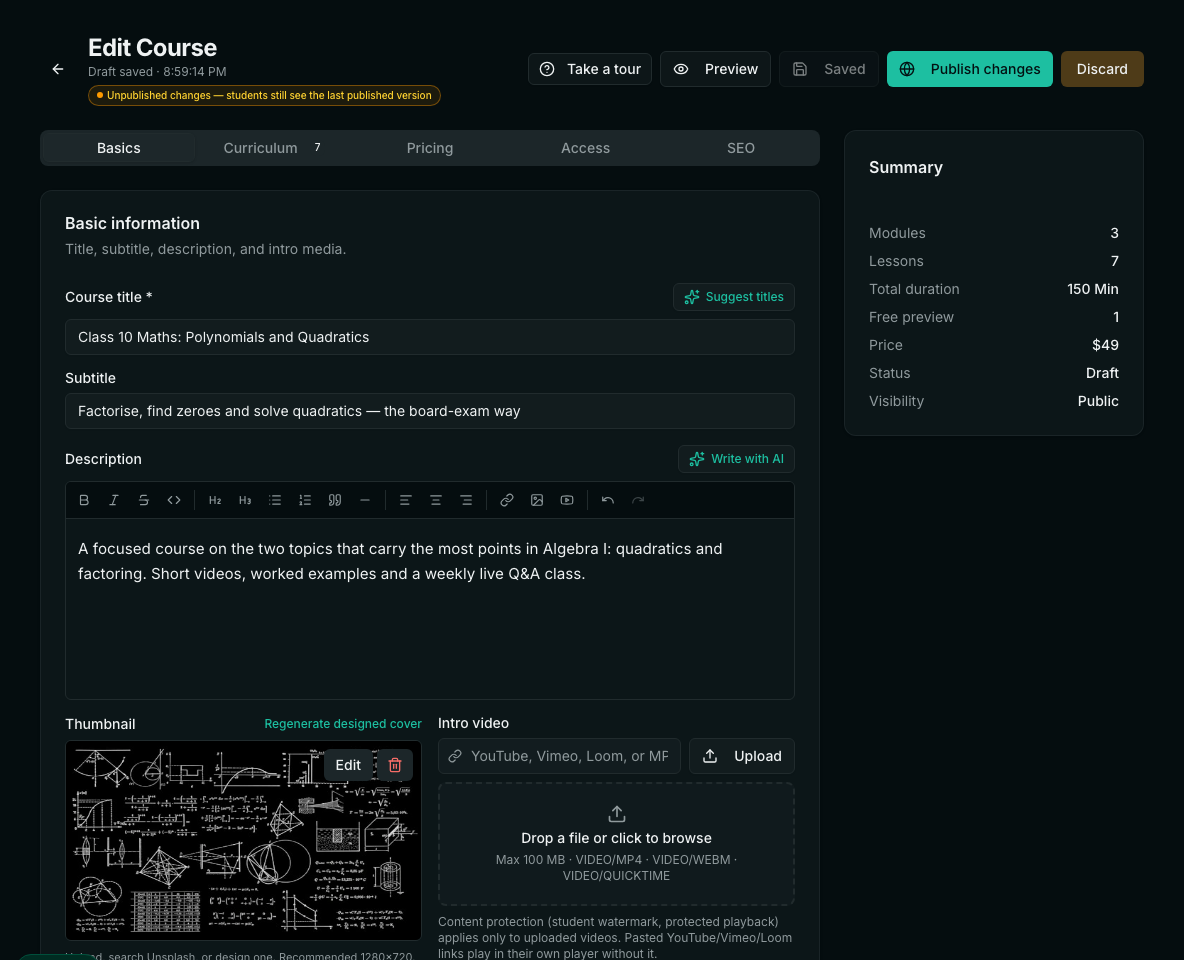
- Thumbnail — 1280×720 works best. Regenerate designed cover makes a branded one from your title.
- Intro video — paste a link or upload a file. Content protection (student watermark, protected playback) applies only to videos you upload; pasted YouTube, Vimeo or Loom links play in their own player.
- Discovery (further down) — category, level, language and tags.
3. Build the curriculum
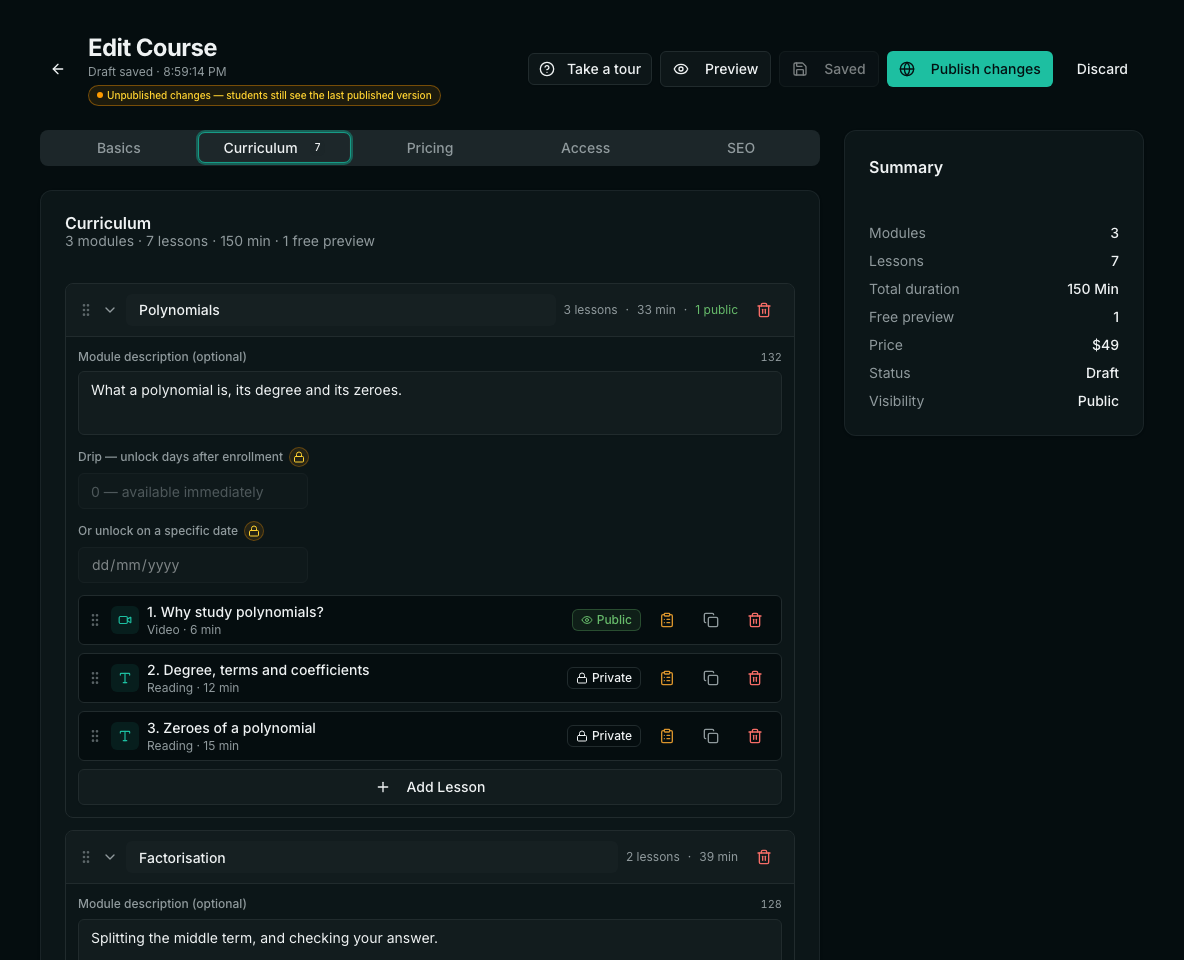
- Add Module, then Add Lesson inside it. Drag the grip handle to reorder modules and lessons, or move a lesson into another module.
- Nine lesson types: Video, Reading, PDF, Document, Embed, Audio, Quiz, Live class and Recording.
- Public / Private on each lesson — Public makes it a free preview anyone can open; Private is for enrolled students. One good free lesson sells a paid course better than any description.
- Drip — unlock a module a set number of days after a student enrolls, or on a fixed date. Available on Pro and above (the lock icon shows on Starter).
- Each lesson has a title, type, duration in minutes, description and attachments. Duplicate copies a lesson; the trash icon deletes it.
4. Set the price
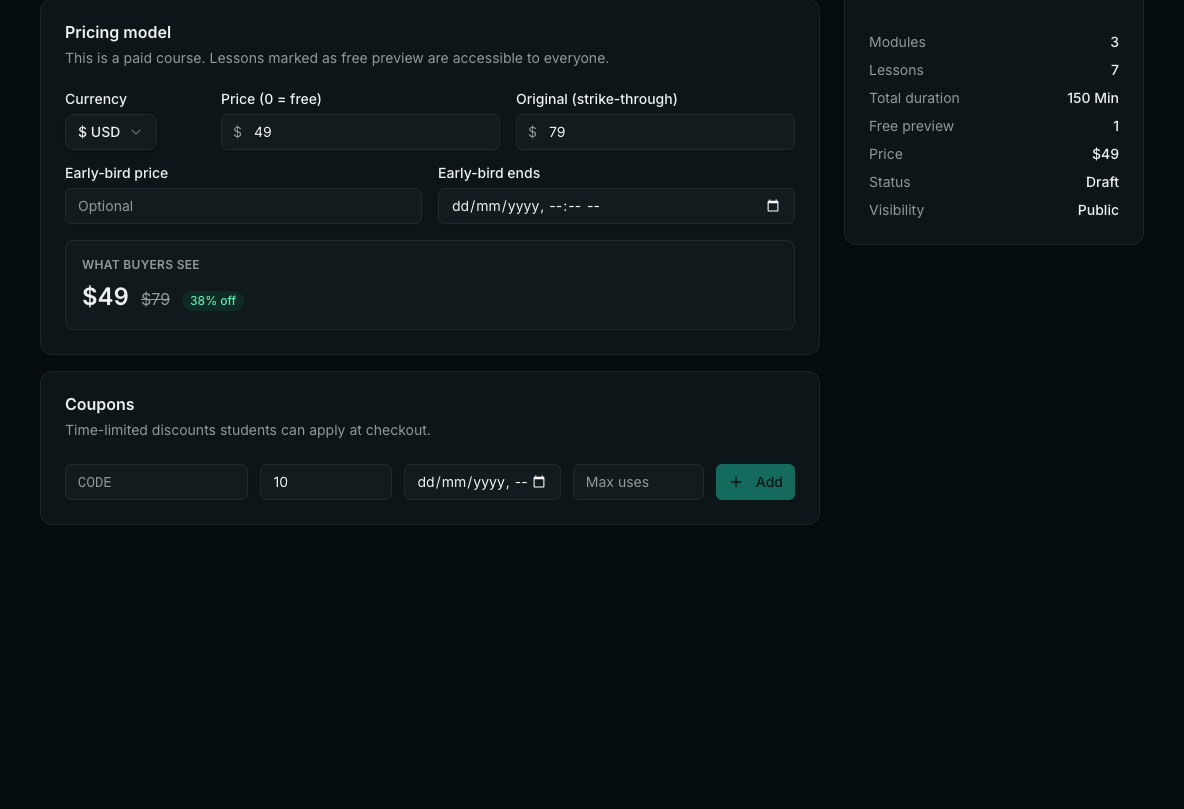
- Price (0 = free) and Original (strike-through) — the gap becomes the "% off" badge.
- Early-bird price and Early-bird ends — the early-bird price only applies when it has an end date.
- USD pricing — only when your main price is in rupees: an optional, separate set of dollar prices for buyers abroad. Leave it blank and they see your main price.
- Coupons — a code, % off, an optional expiry and a maximum number of uses. Students apply it at checkout.
To take payments you need to connect your own Stripe or Razorpay account first — the dashboard prompts you, and Payouts is where you do it. Free courses need nothing.
5. Decide who can get in
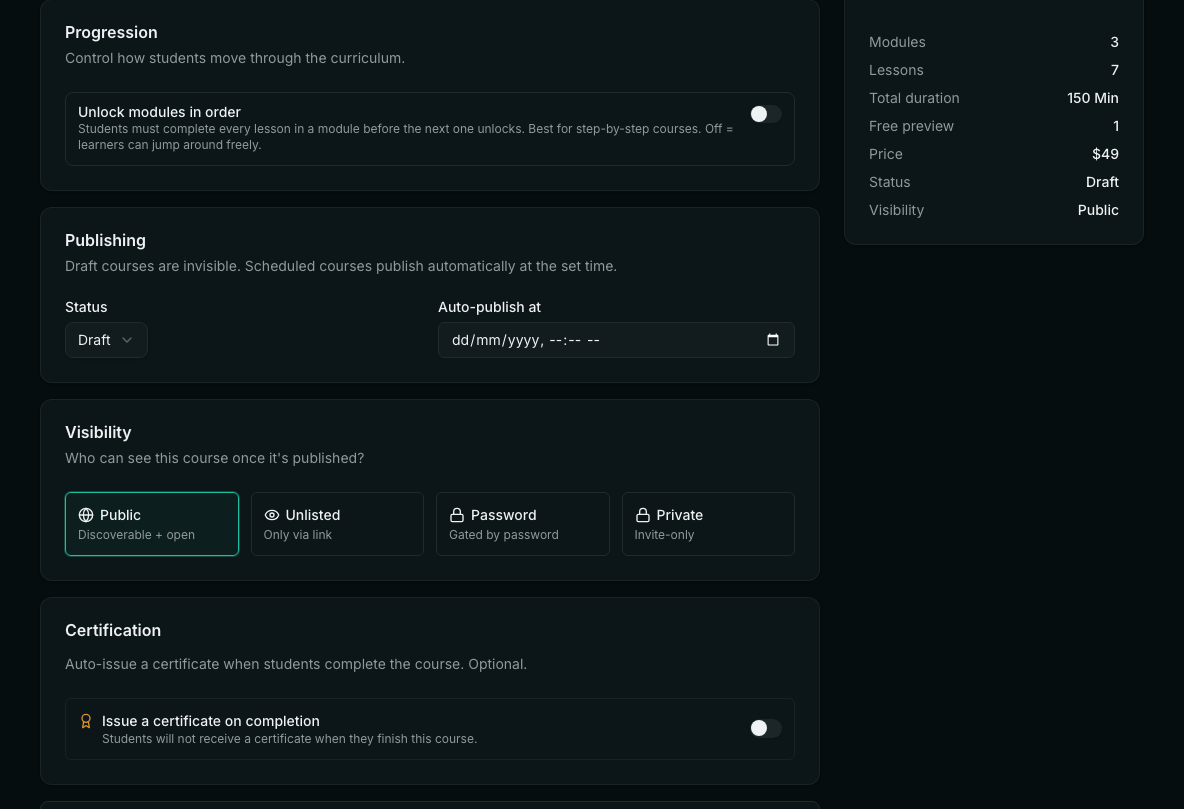
- Unlock modules in order — students must finish a module before the next opens. Leave it off to let them jump around.
- Status and Auto-publish at — publish now, keep as draft, or schedule it.
- Visibility — Public (listed in your catalog and open to all), Unlisted (only people with the link), Password (anyone with the password), or Private (invited students only).
- Certification — issue a certificate automatically on completion, and optionally require assessments to earn it.
Visibility and status take effect the moment you change them — they don't wait for Publish changes.
6. Check how it looks on Google
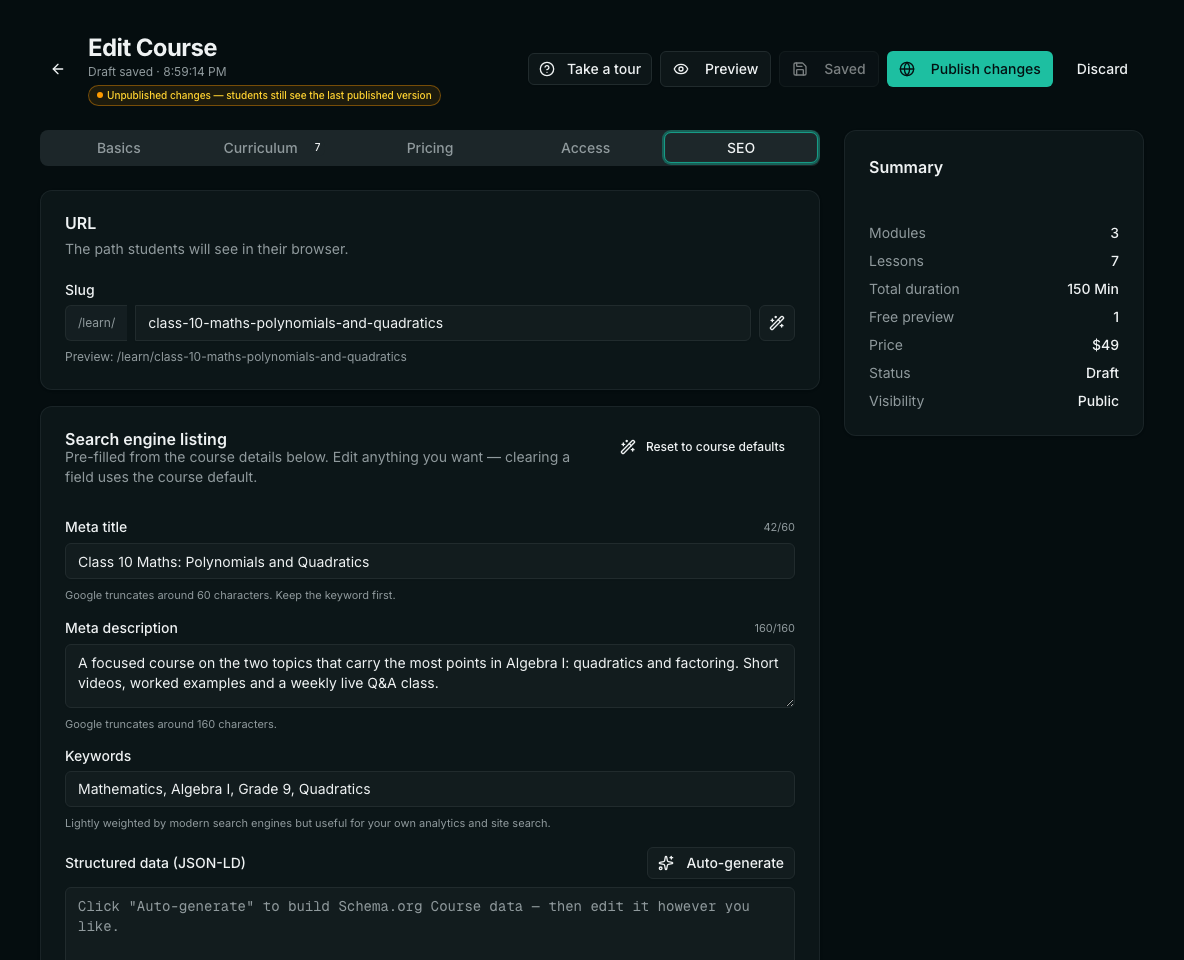
- Slug — the address of the course. Keep it short, and settle it before you start sharing the link.
- Meta title (up to 60 characters) and meta description (up to 160) — what Google shows. Clear a field to fall back to the course default.
- Social share image — what appears when the link is shared on WhatsApp or LinkedIn. Use course cover, or Generate one at 1200×630.
7. Preview and publish
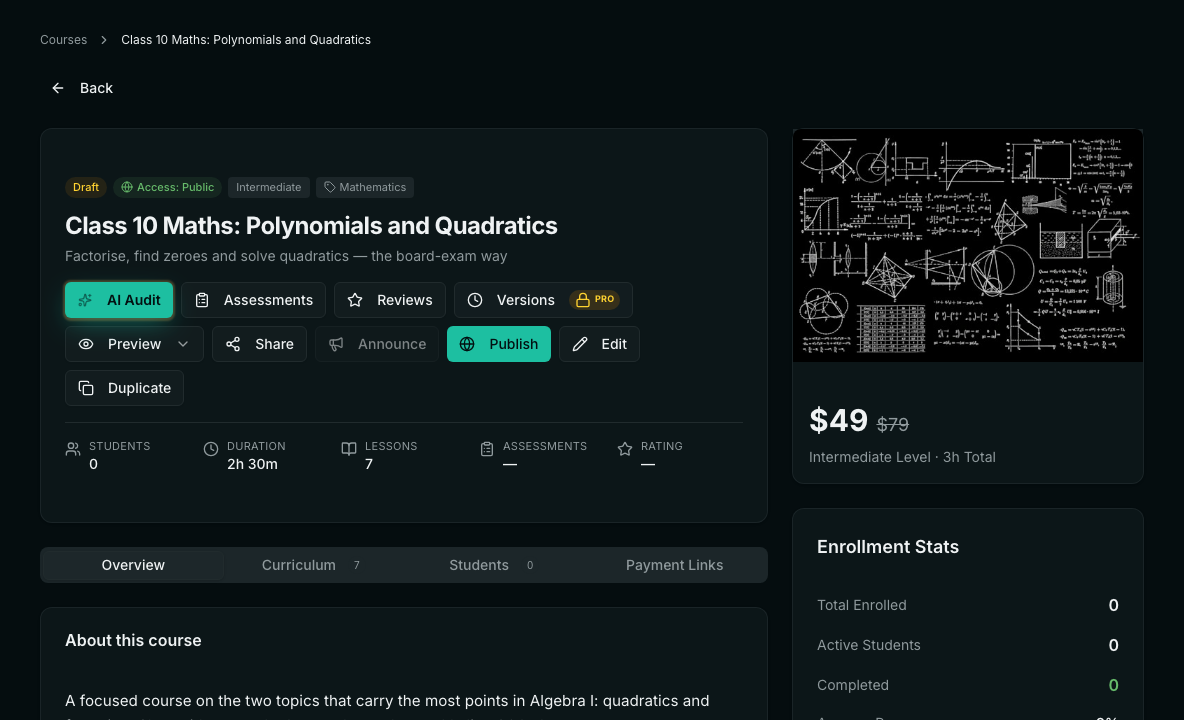
Before publishing, open Preview and look at the course three ways — As public visitor, As fresh student and As halfway student. AI Audit gives a deeper review of the course with suggestions. When it's ready, click Publish.
Publishing from the editor runs a quick check first. It stops you if the title is shorter than 8 characters, if there is no module with a lesson, or if no lesson has any content — a student would hit a broken course. It also warns about a missing description, cover, category or SEO description, or empty lessons; you can fix those or click Publish anyway.
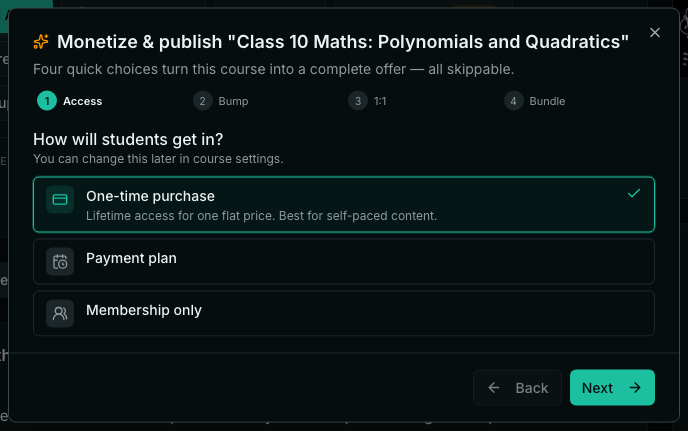
- Access — One-time purchase, Payment plan (2–12 installments, charged automatically or on reminders) or Membership only.
- Bump — an add-on offered at checkout.
- 1:1 — sell a one-to-one session alongside the course.
- Bundle — package it with other courses at a discount.
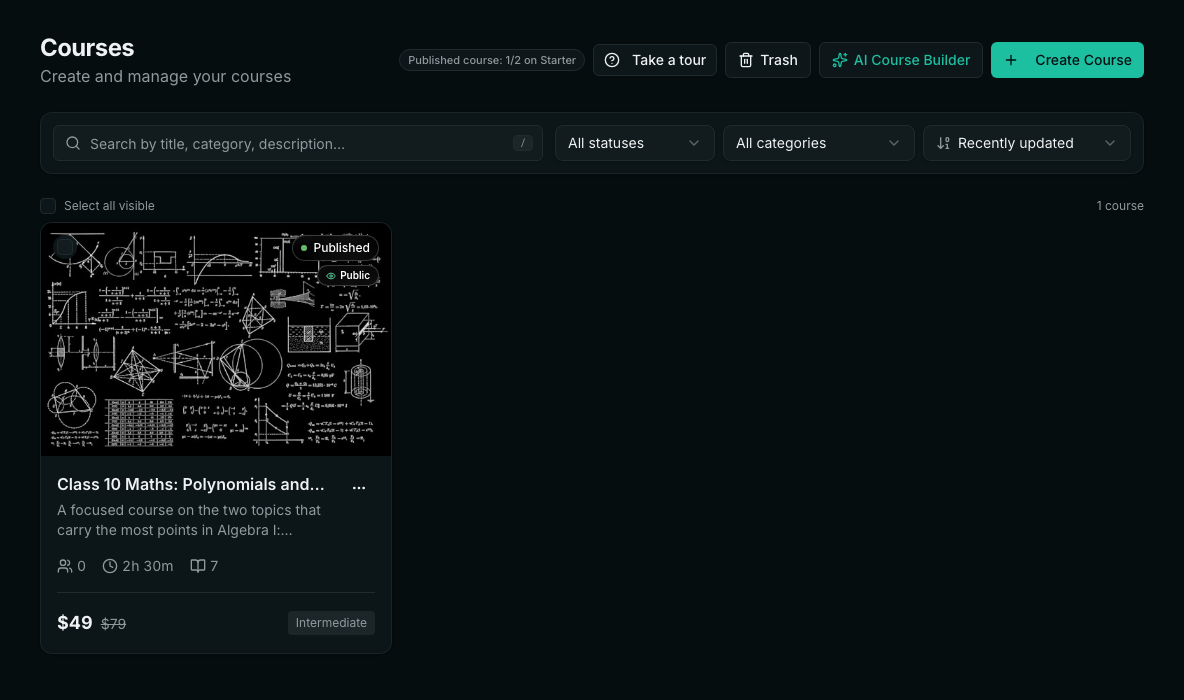
Click Publish course. It appears on your Courses page as Published, and in your academy's catalog if it's Public.
8. What your students see
Your course lives on your academy's own site at https://your-academy.prolaud.com/courses/details/your-course — or your own domain, once connected. Use Share on the course page to copy the link.
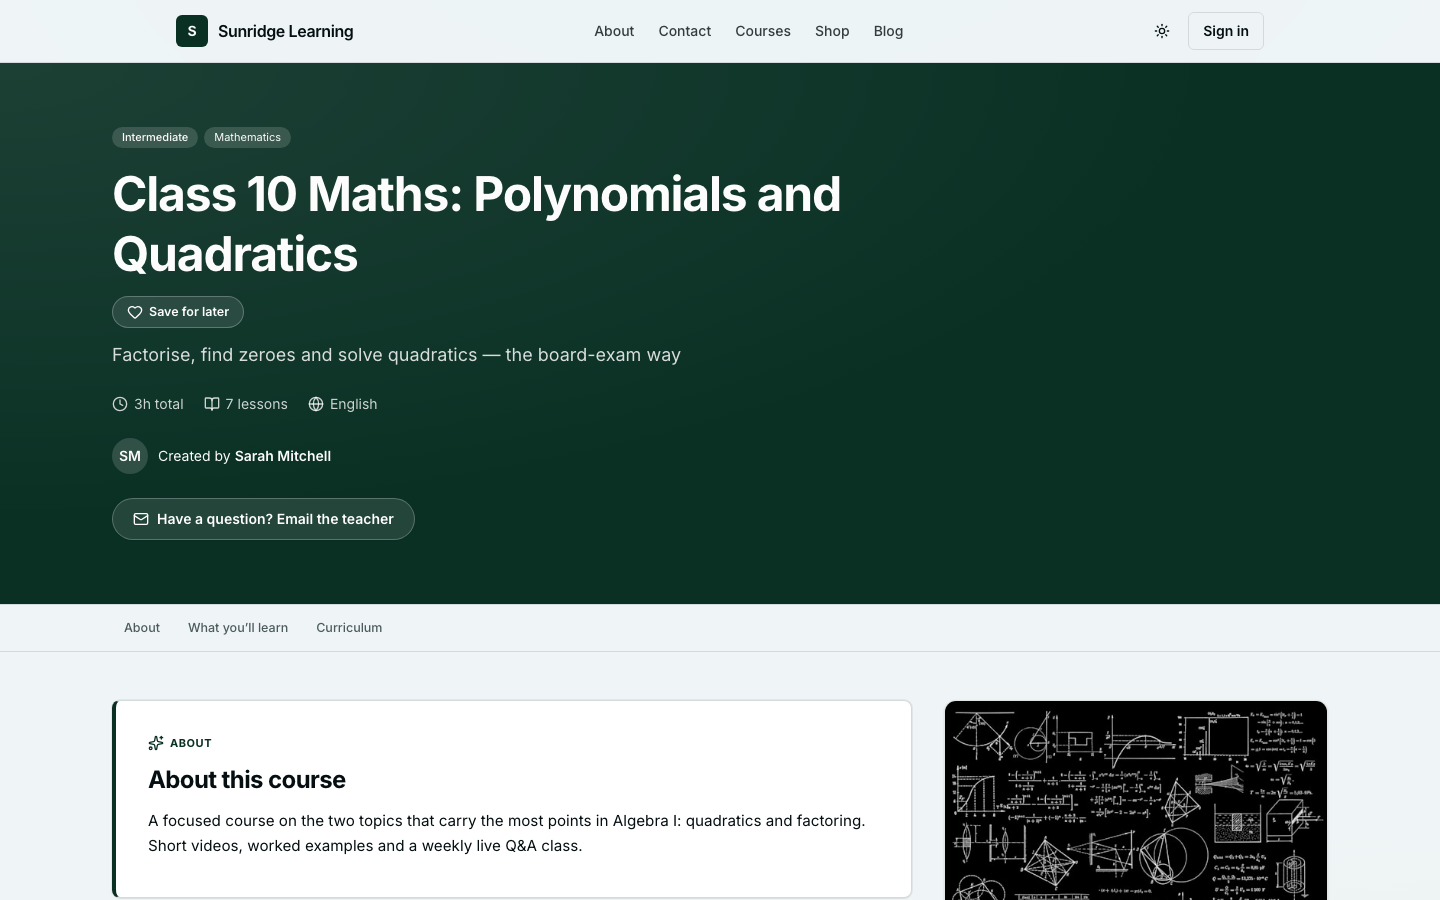
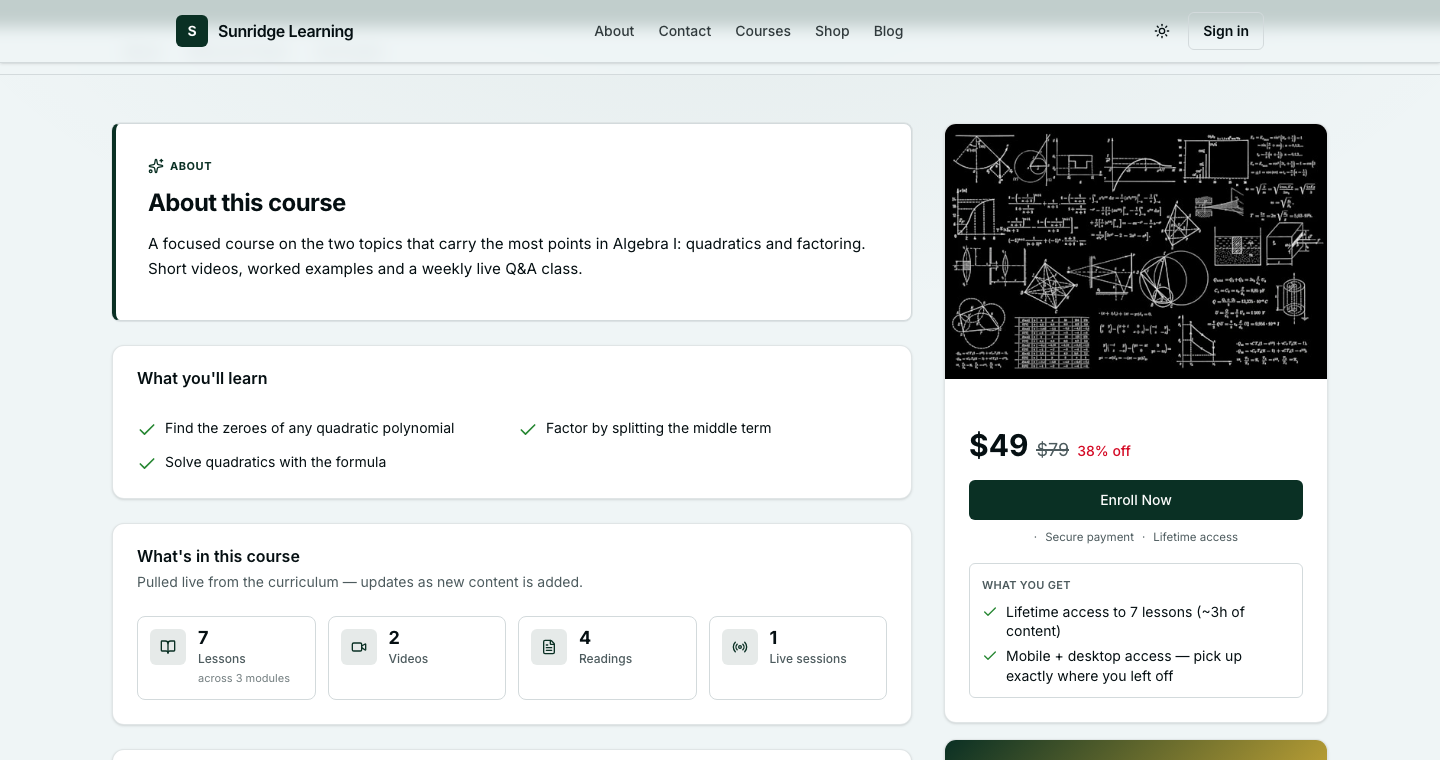
A visitor clicks Enroll Now and goes through checkout — or straight in, for a free course. Once they're enrolled, the button reads Continue Learning.
After you publish
- Announce — one message to your students in the app, by email, on WhatsApp and in the course's community. Available once the course is published.
- Edit freely — changes stay in draft until you click Publish changes, so live students are never mid-lesson in a half-edited course.
- Unpublish at any time — the course goes back to draft; nothing is deleted.
- Duplicate — copy a course with or without its curriculum, certificate and pricing. Handy for a new cohort or a second level.
- Do I have to fill in everything before creating a course?
- No. Only the title is required to create it. Everything else can be added later in the editor — the course stays a draft until you publish.
- Can I use AI and still write parts myself?
- Yes. Generate with the AI Course Builder, then edit, replace or add lessons in the Curriculum tab like any other course. You can also use Write with AI and Suggest titles on a course you're building by hand.
- Can I change the price after publishing?
- Yes. Change it in the Pricing tab and click Publish changes. Students who are already enrolled keep their access.
- How do I give away one lesson for free?
- In the Curriculum tab, set that lesson to Public. Anyone can open it from the course page, without enrolling.
- Will students see my changes while I'm editing?
- No. Content edits are saved as a draft and go live only when you click Publish changes. Status and visibility are the exceptions — they apply immediately.
- Build a course curriculum — Modules, lessons and drag-to-reorder in depth.
- Lesson types — What each of the nine types is for.
- Free previews and locked lessons
- Drip content
- Course pricing, discounts and early bird
- Coupons
- Payment plans
- Public, unlisted, password and private courses
- Certificates
- Course SEO
- Monetize & publish
- Preview a course as a student
- AI Audit
- Duplicate a course
Related