For creators
Run an academy with several levels: step by step
Fifteen things you will set up or check when you sell more than one level. Each has the steps, a picture of the screen, and a plain note where something is not available.
Last updated Oct 7, 2026
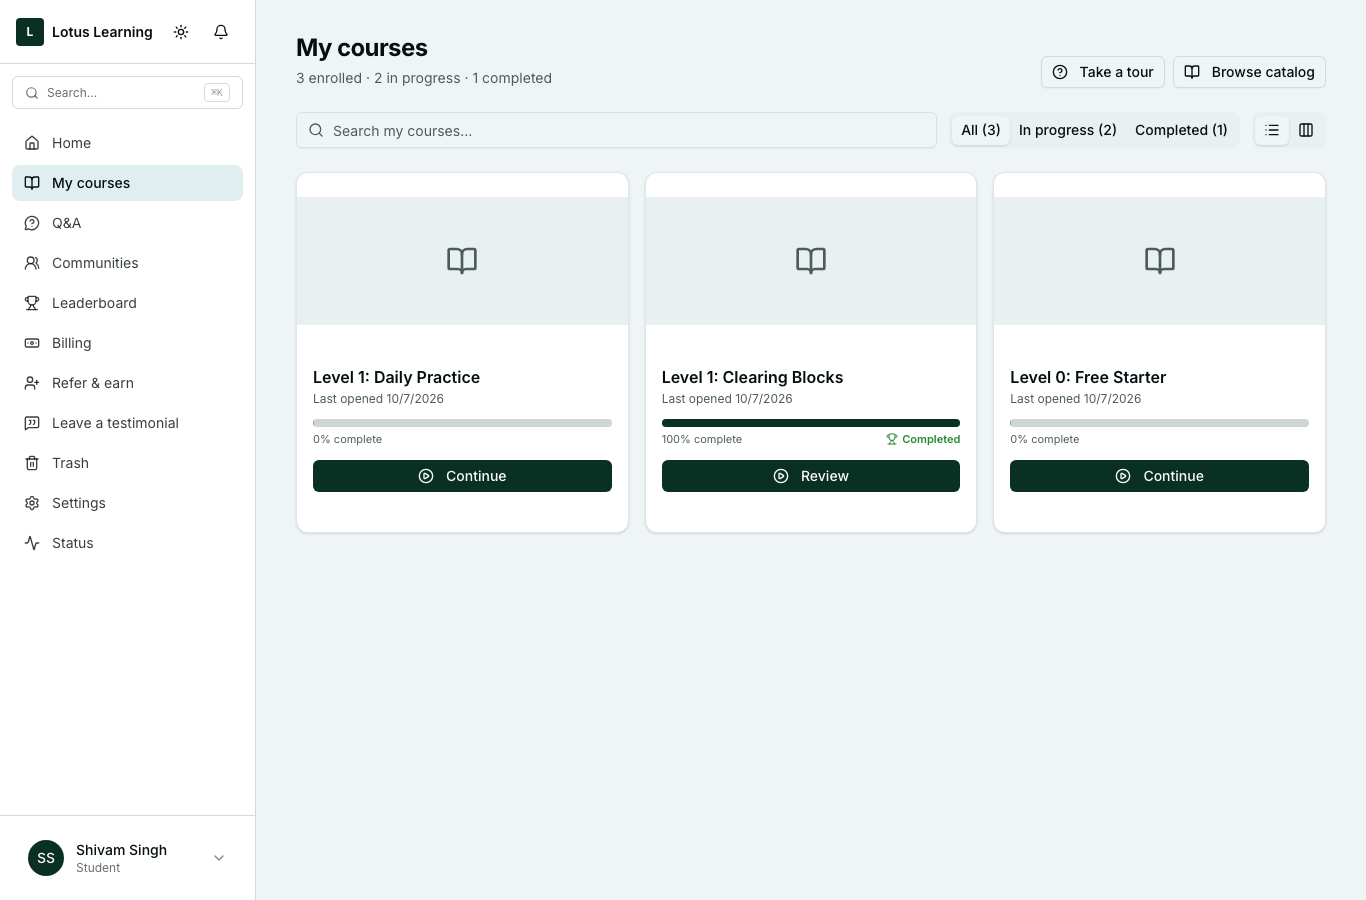
1. One student account across all products
- The student signs up on your site once, with their email.
- For every later course they sign in with the same email.
- Each course is added to My courses in that one account.
- To check: open Students in your dashboard. Each student is listed once.
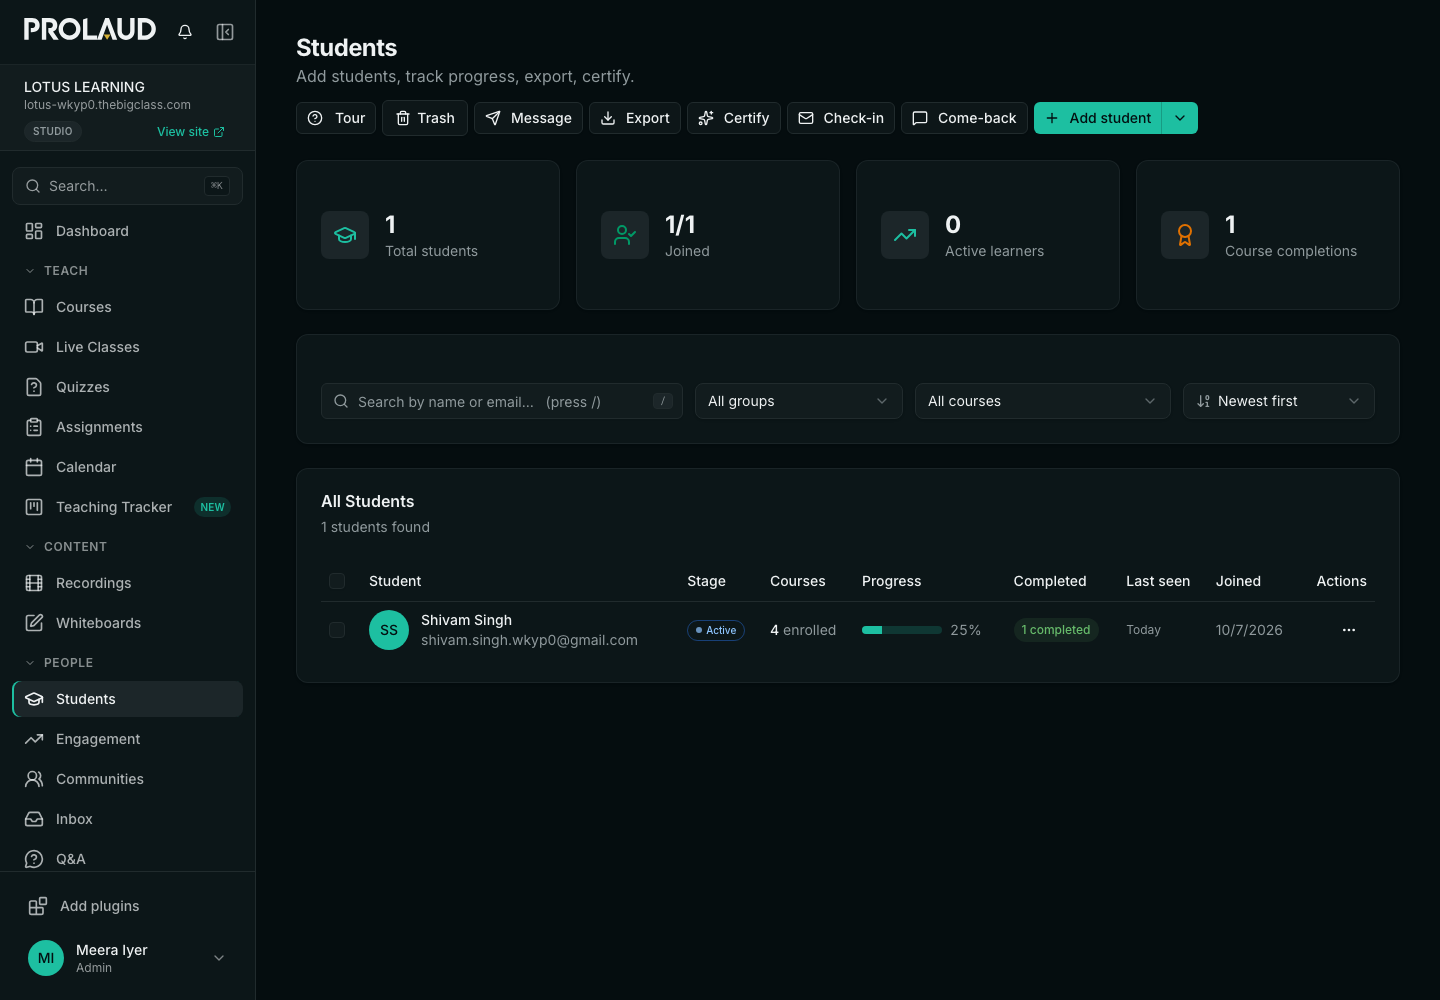
- The account is matched by email. A different email makes a second account.
- Progress is the same on phone and laptop.
- Not available: merging two accounts into one.
2. Several Level 1 products with one shared community
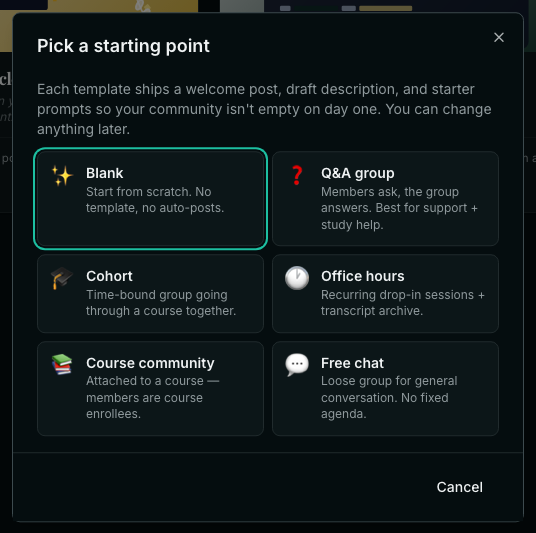
- Open Communities and click New community.
- Pick a starting point (Blank is fine), give it a name such as Level 1 Community, and click Create community.
- Open Courses and click a Level 1 course.
- In the Community card on the right, choose Level 1 Community.
- Do the same on every other Level 1 course.
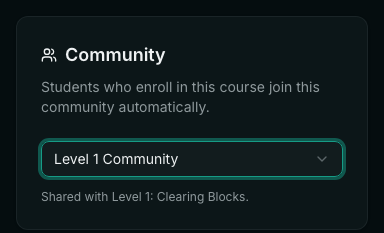
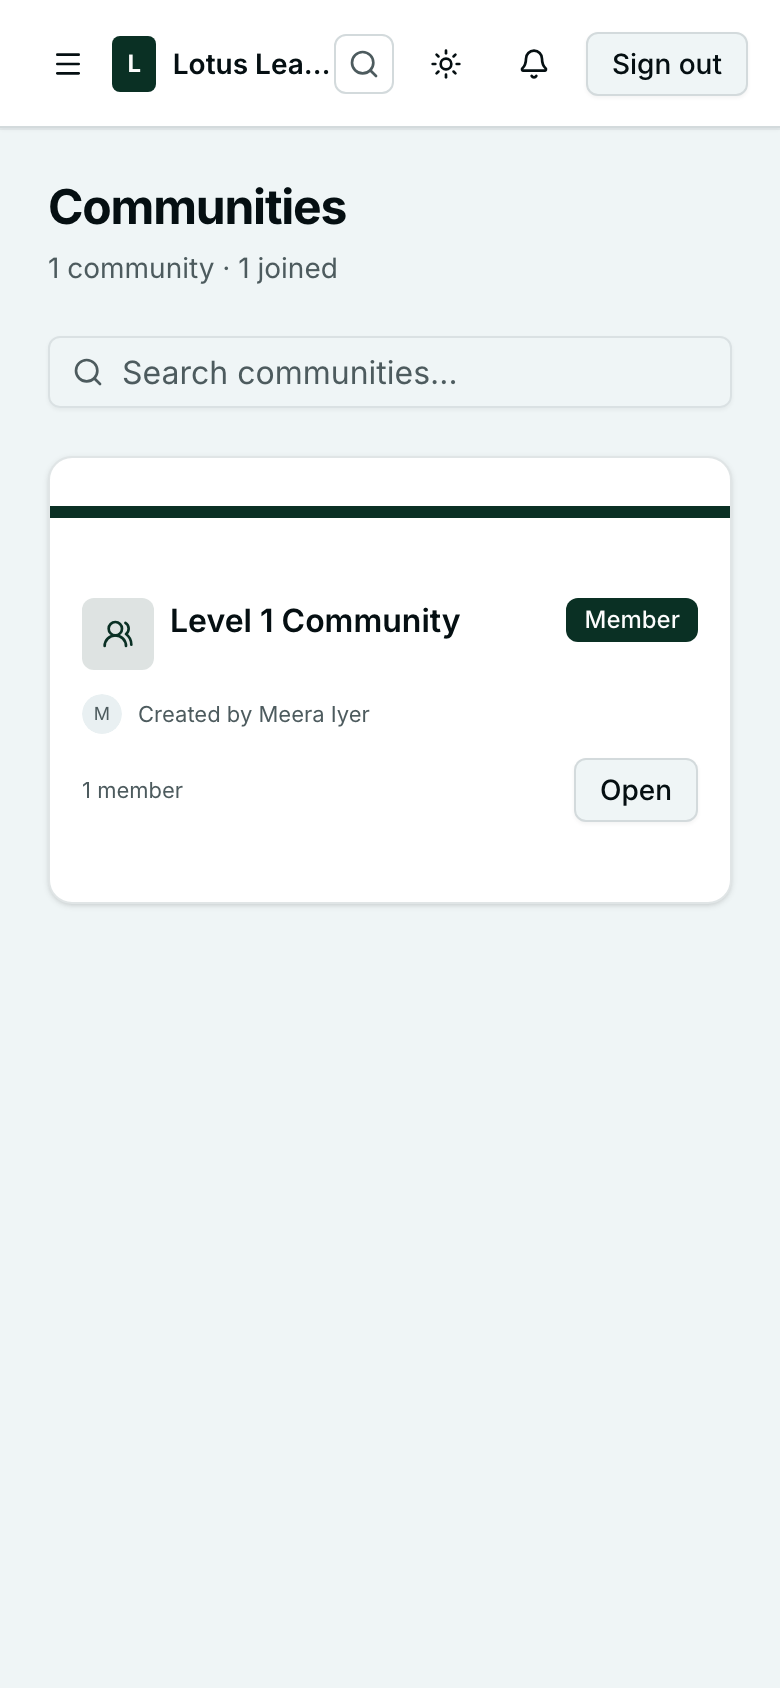
- A student who enrolls in any of these courses joins the community automatically.
- A second Level 1 course does not add them twice.
- If you remove a student from the community yourself, they stay removed.
3. A Level 2 membership that opens the Level 1 library
- Open Add plugins and add the Storefront.
- In Storefront, create a product of type Course access for each Level 1 course, and publish each one.
- Create one more product and pick Membership.
- Under "What's included with the membership", tick the Level 1 products.
- Under Price, choose Subscription and enter the amount.
- Click Publish.
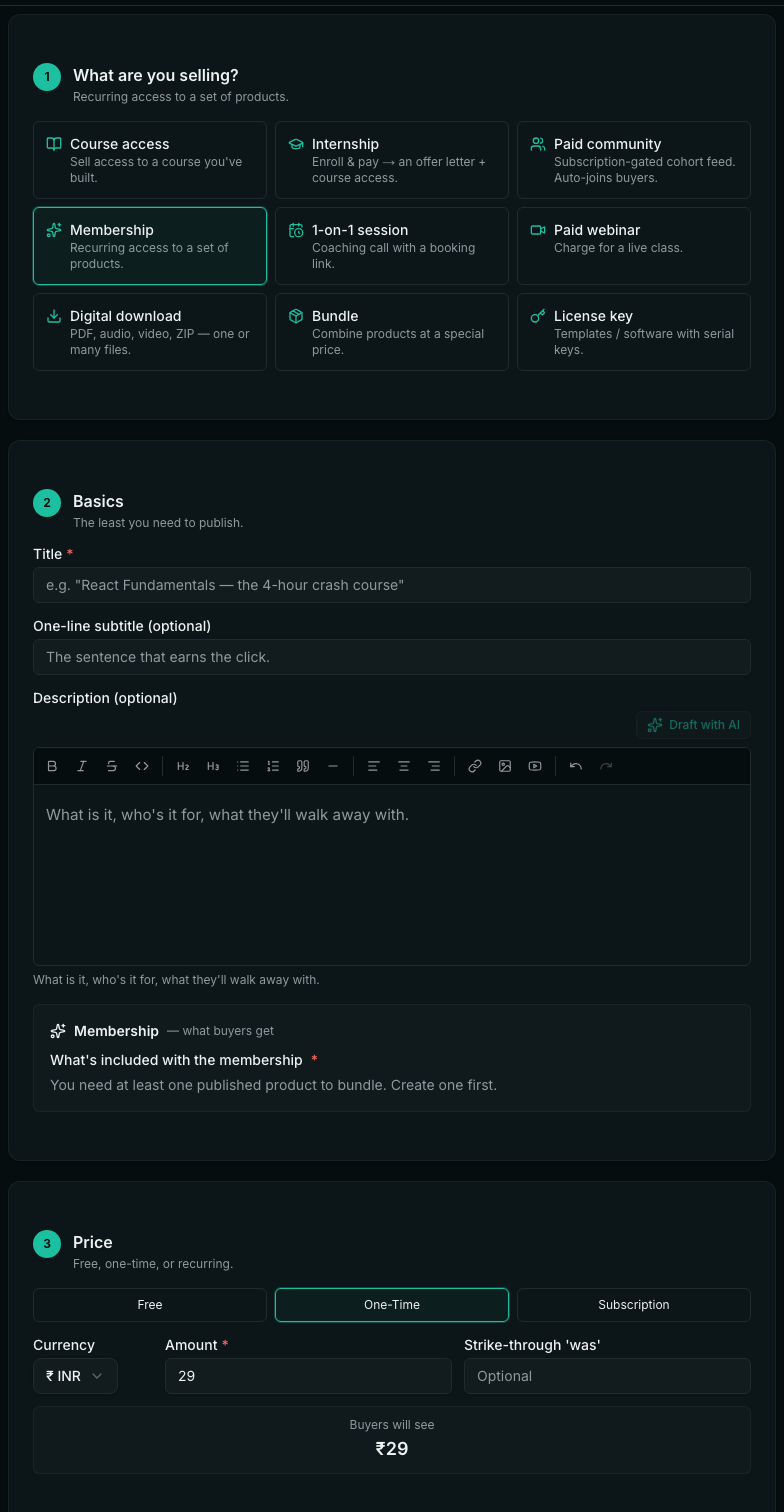
- Members keep the included courses and their community while they pay.
- Lesson progress is kept if they leave and come back.
- Not available: an "everything in Level 1" setting. When you add a new Level 1 course, tick it in the membership too.
- For a membership priced in rupees, connect Razorpay with your own API keys. The one-click Razorpay sign-in cannot take recurring payments.
4. Higher-level programs and live cohorts
Limit a live class to one cohort:
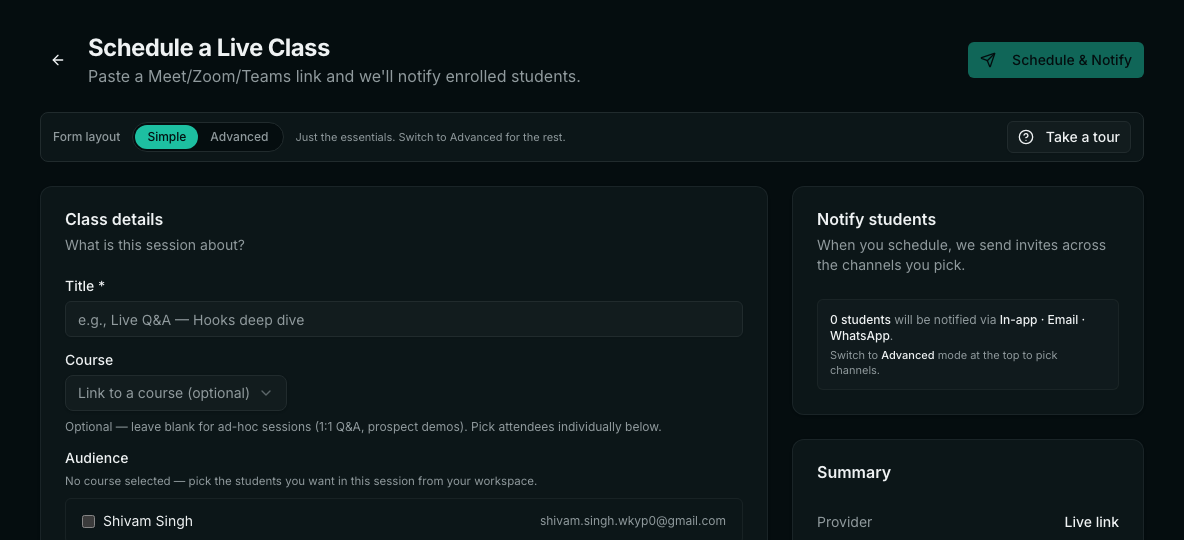
- Open Live Classes and click Schedule class.
- Enter a title. Under Course, choose the program.
- Switch on Only these students can join.
- Click Schedule & Notify.
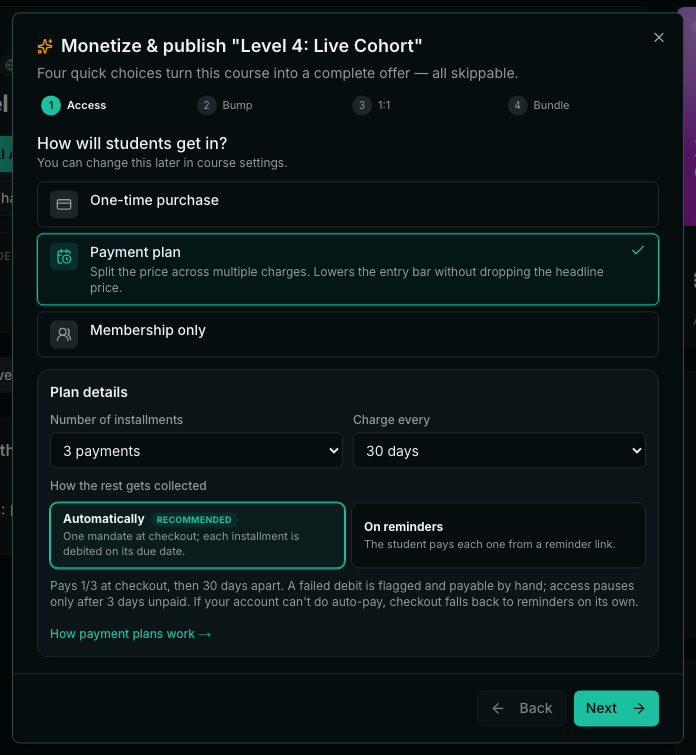
Let students pay a high-priced program in parts:
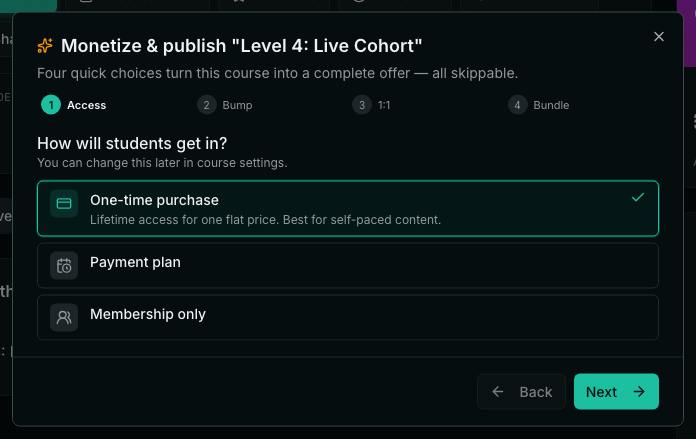
- Open the course and click Publish.
- Under "How will students get in?", pick Payment plan.
- Choose the number of installments (2, 3, 4, 6 or 12) and how often to charge (every 7, 15, 30 or 60 days).
- Choose Automatically or On reminders, then click Next and finish.
- Class reminders go out 3 hours, 1 hour and 15 minutes before, to the students of that class.
- Not available: automatic credit for what a student already paid at a lower level. Give them a coupon instead.
5. Payments, access, cancellation and refunds
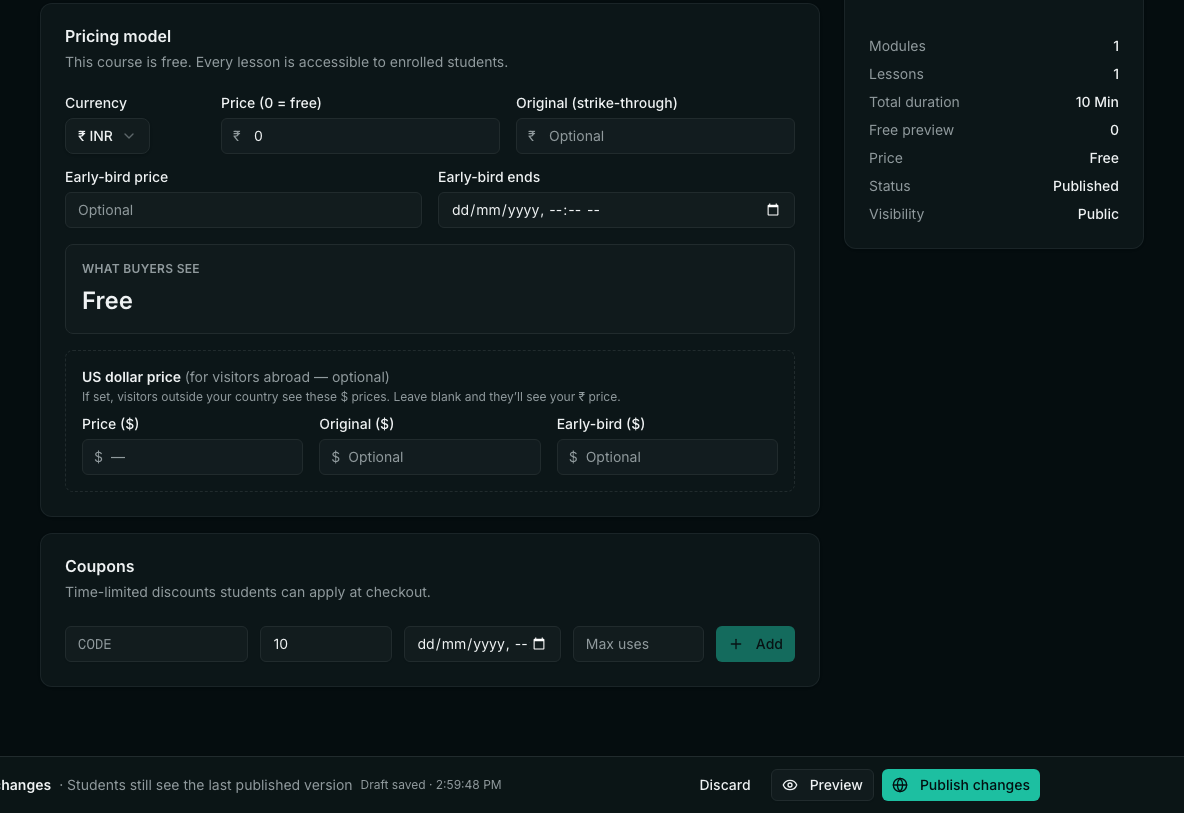
Set a price:
- Open the course and click Edit.
- Open the Pricing tab.
- Choose the currency and enter the price. 0 makes the course free.
- Click Publish changes.
Refund a course bought from its course page:
- Refund the payment in your Razorpay or Stripe dashboard.
- Prolaud is told by the payment company. After a full refund, the student's access ends the next time they load a page.
Refund a Storefront order paid through Stripe:
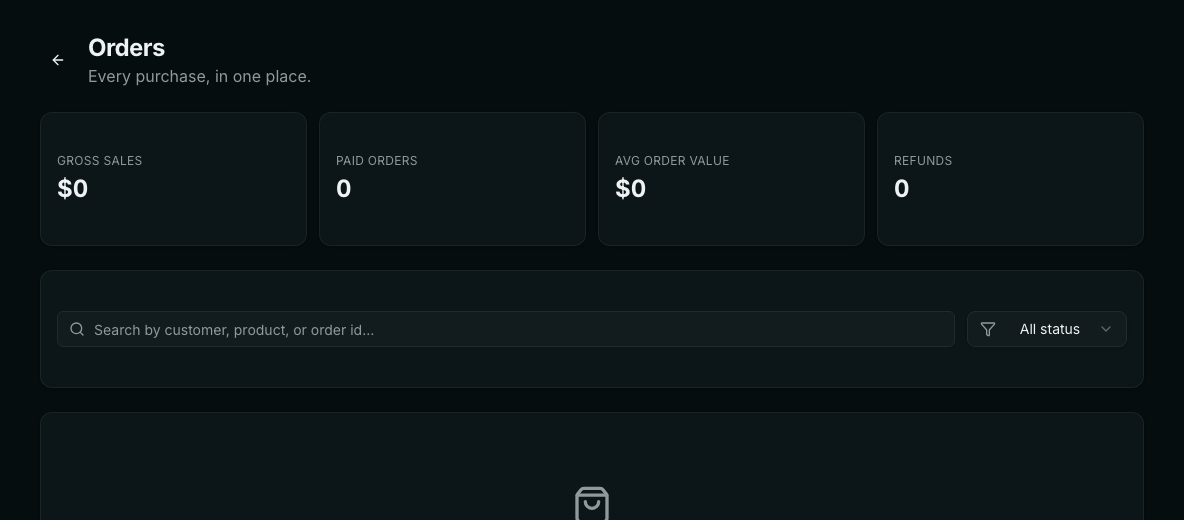
- Open Storefront and click Orders.
- Click Refund on the order.
- Click Refund + revoke access.
- Paid course: access opens when the payment is confirmed.
- Free course: access opens when the student enrolls.
- Buying a course the student already owns is refused, so nobody pays twice.
- Membership cancelled: access stays until the end of the period already paid for.
- Membership payment failed: 3 days of grace, then access pauses. It reopens when the payment goes through.
- Payment plan installment missed: 3 days of grace, then the course pauses. It reopens on payment.
- A partial refund of a course leaves access in place.
- Not available: a refund button for payments on your own Razorpay account. Refund those in Razorpay.
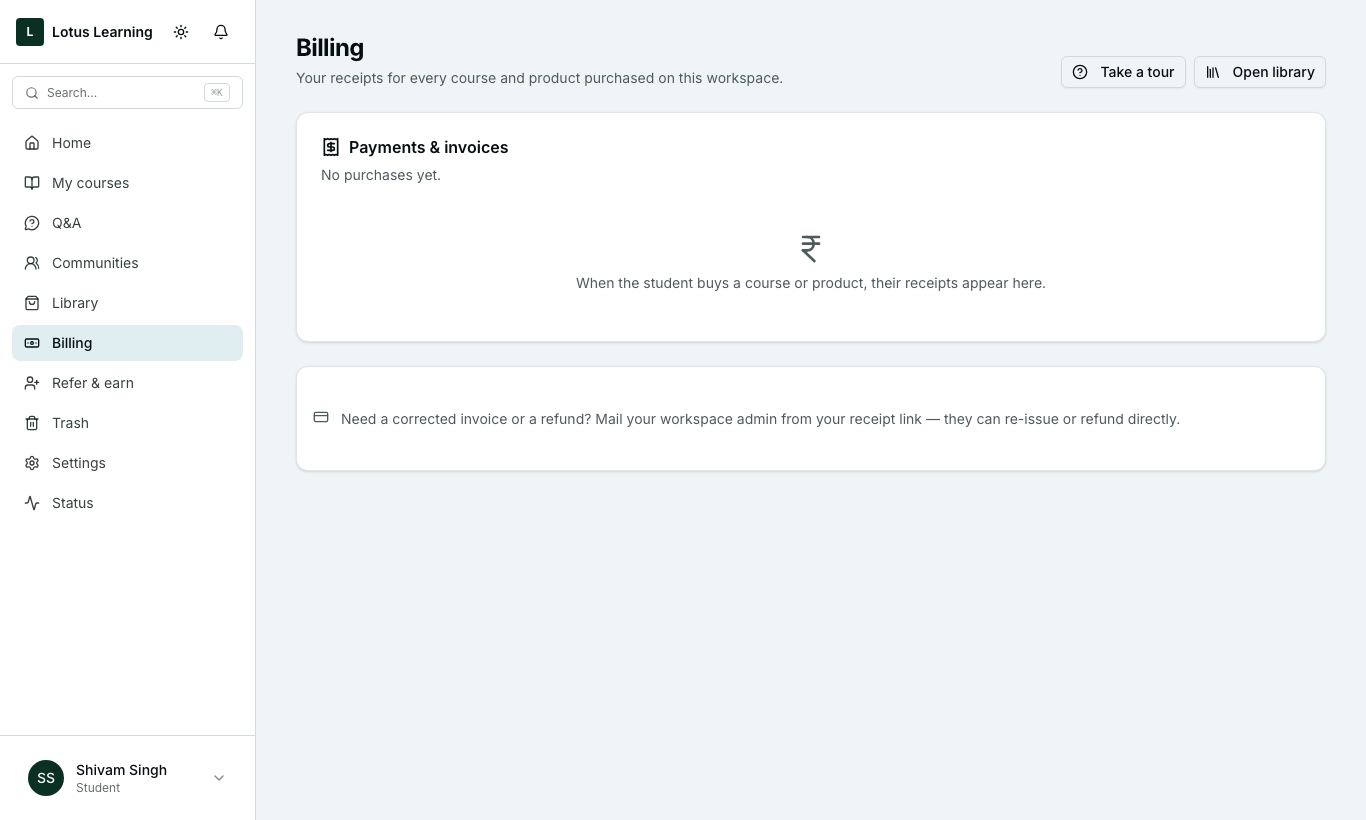
- Students see their receipts under Billing.
6. Community access and engagement tracking
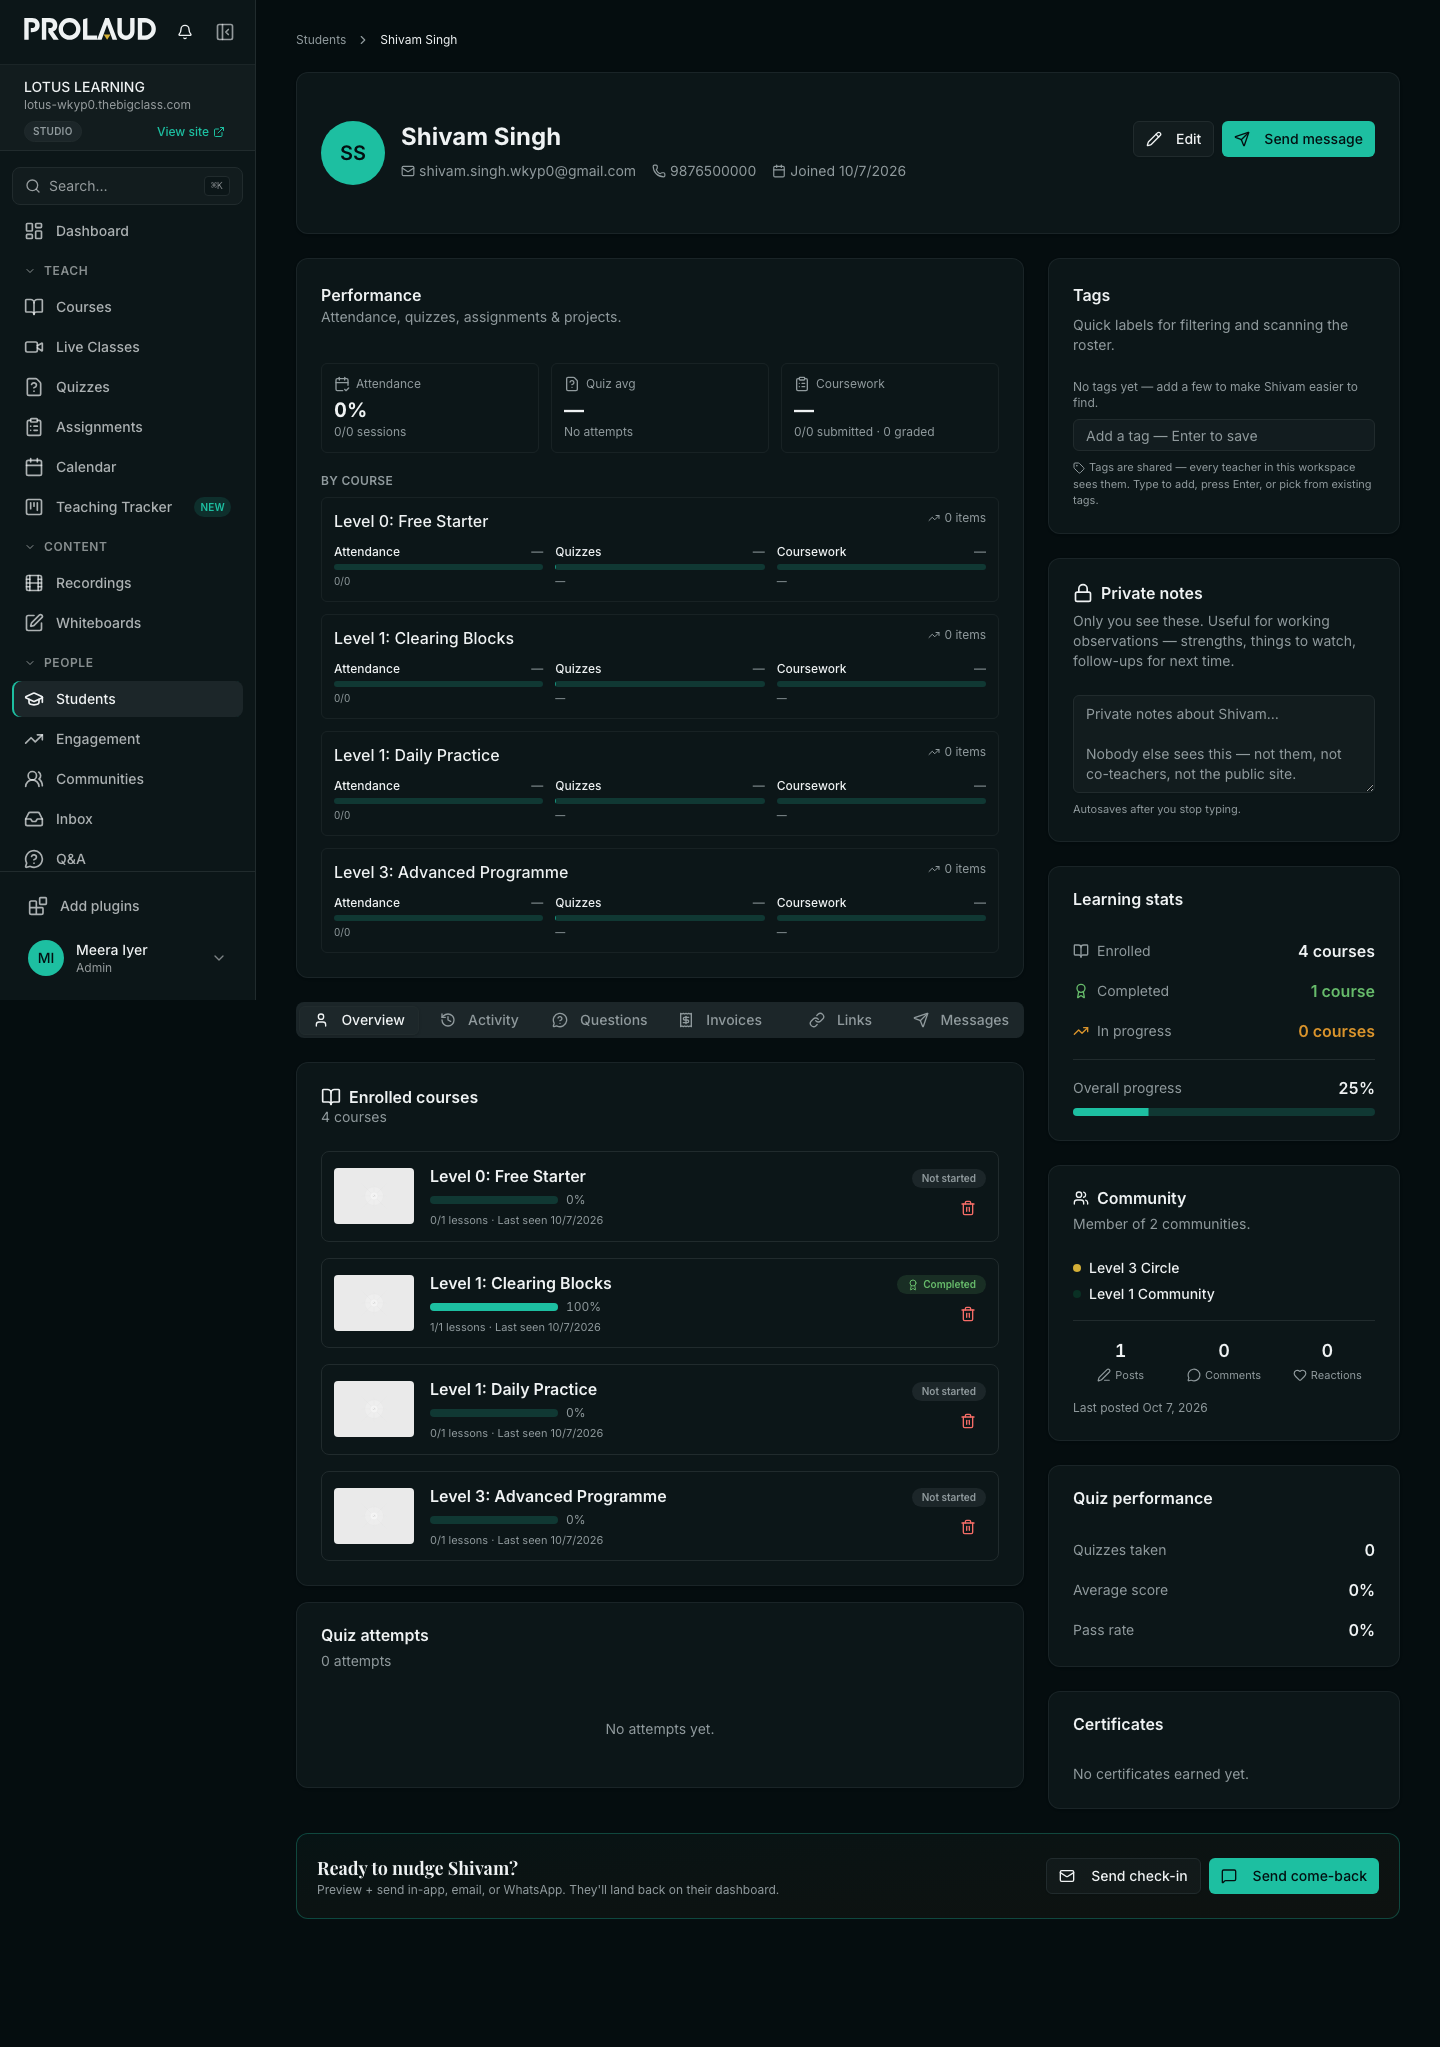
- Open Students and click a student's name.
- On Overview, find the Community card. It lists their communities with Posts, Comments and Reactions.
- Open the Activity tab to see their posts in date order with lessons and classes.
- For everyone at once, open Engagement.
- Click Roster & nudges to see each student's stage and last active day.
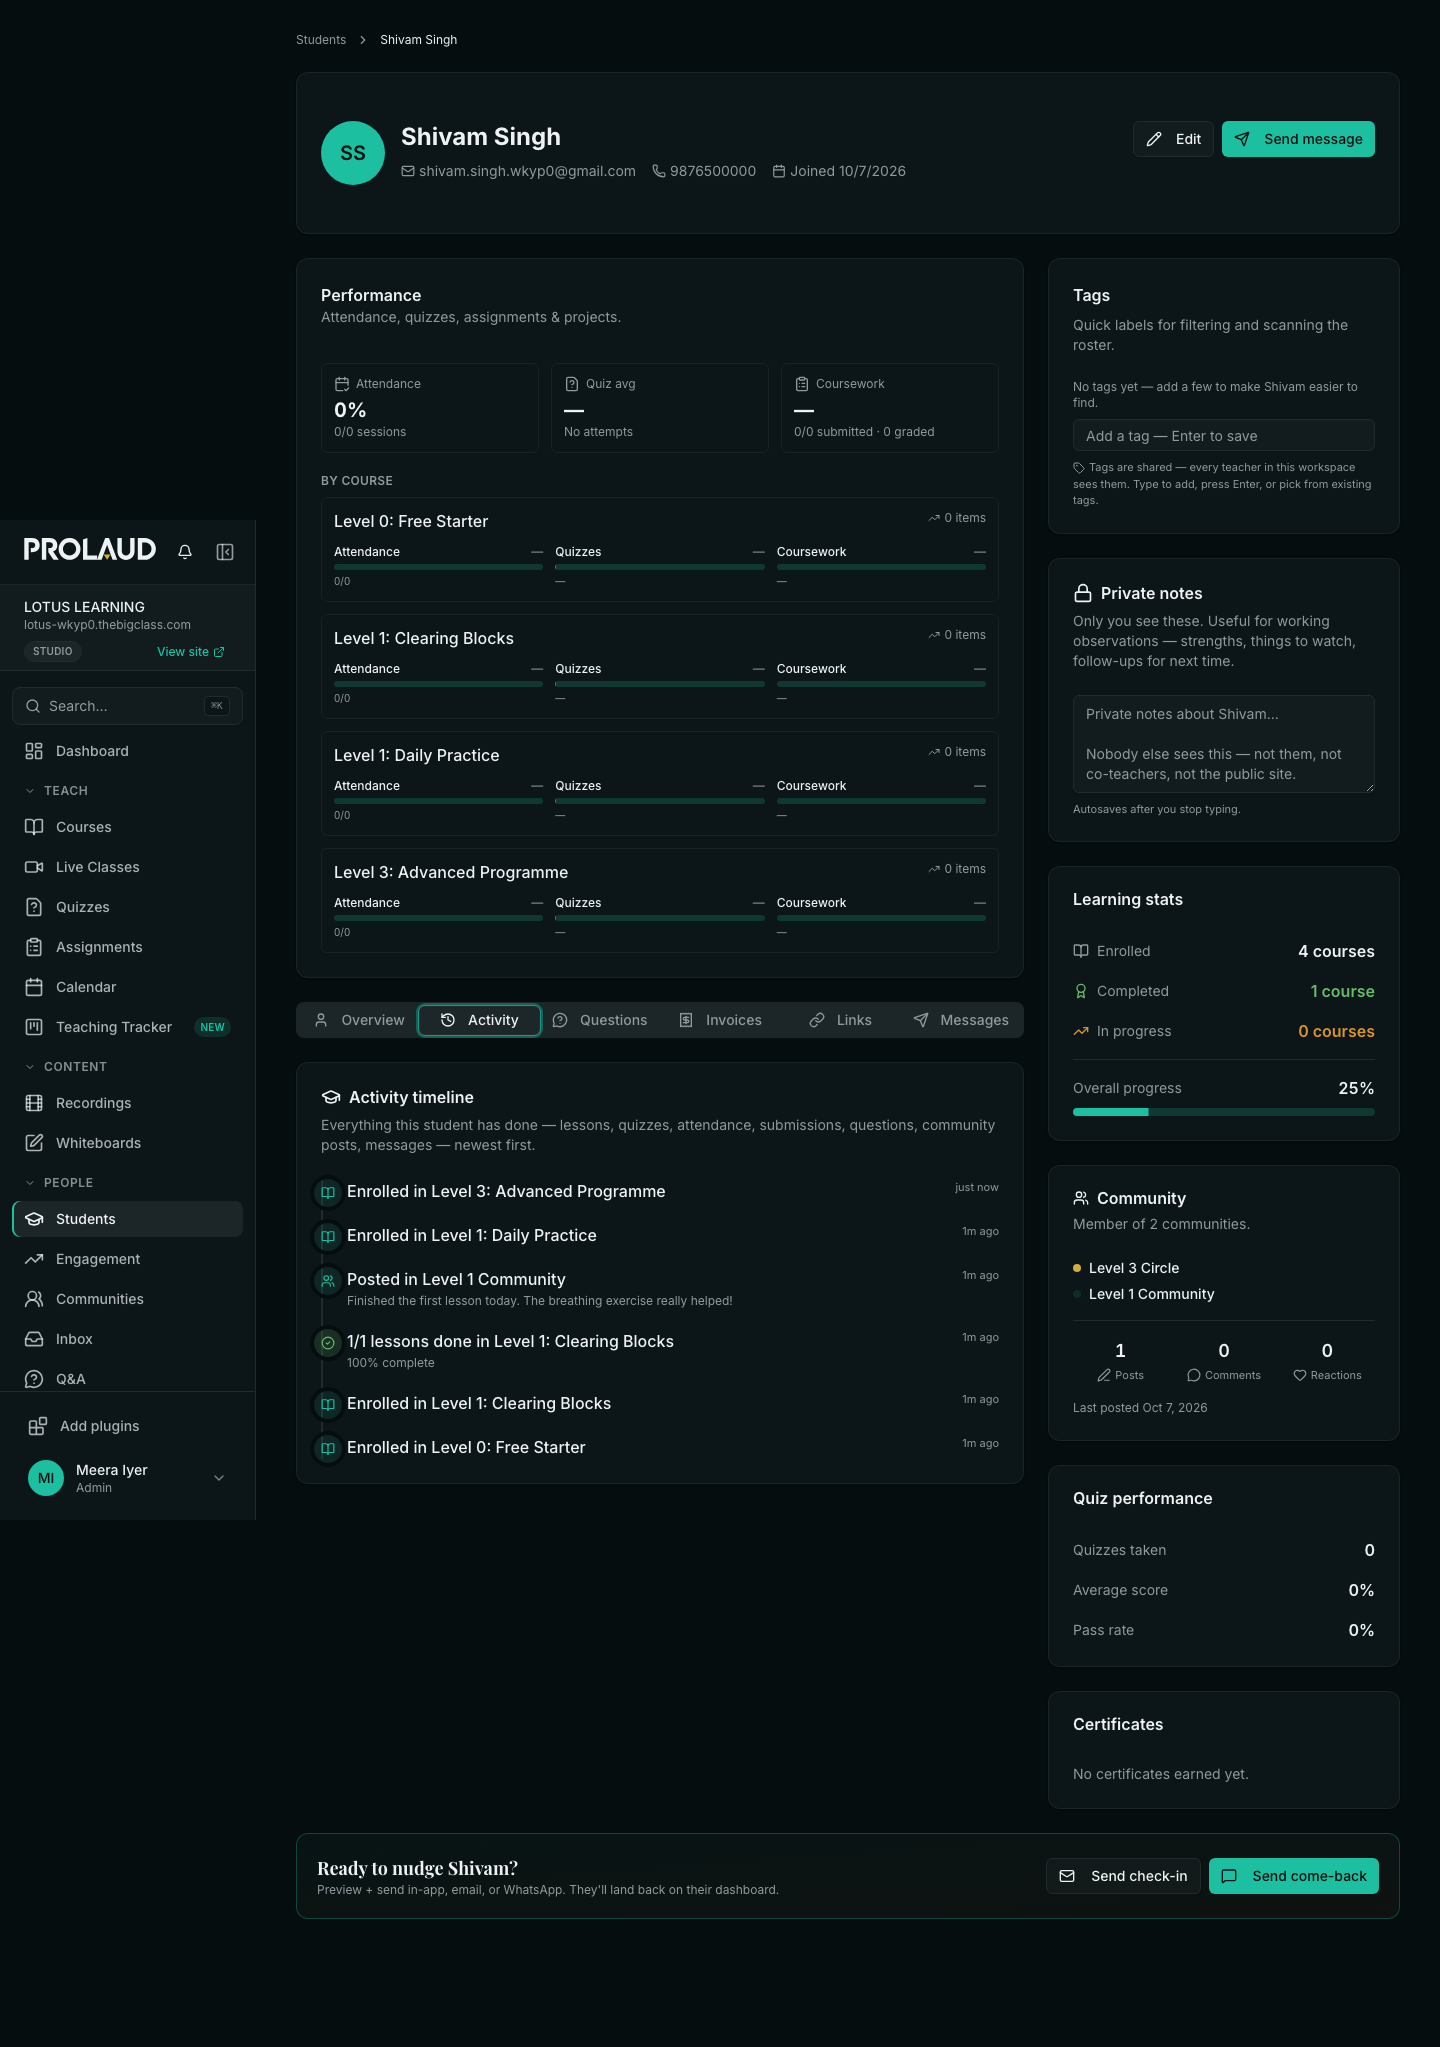
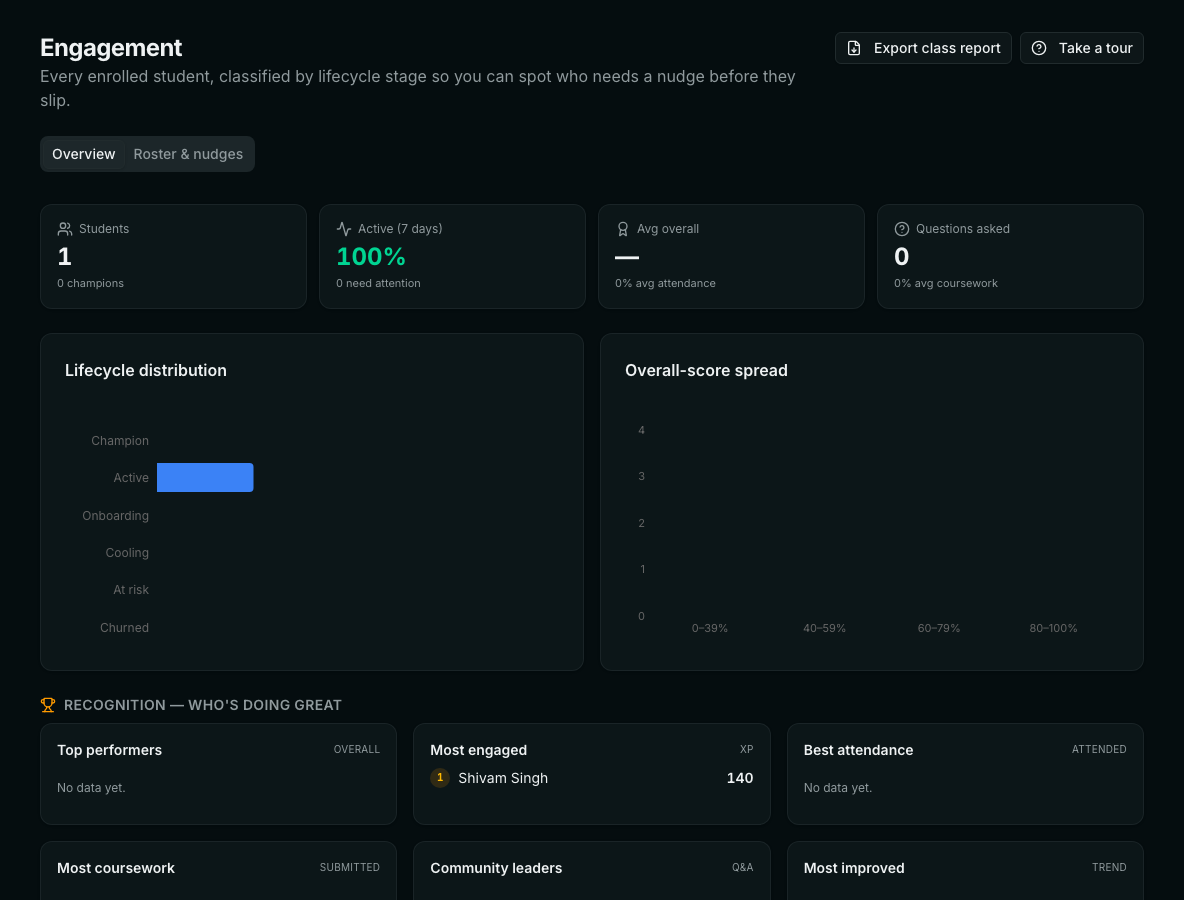
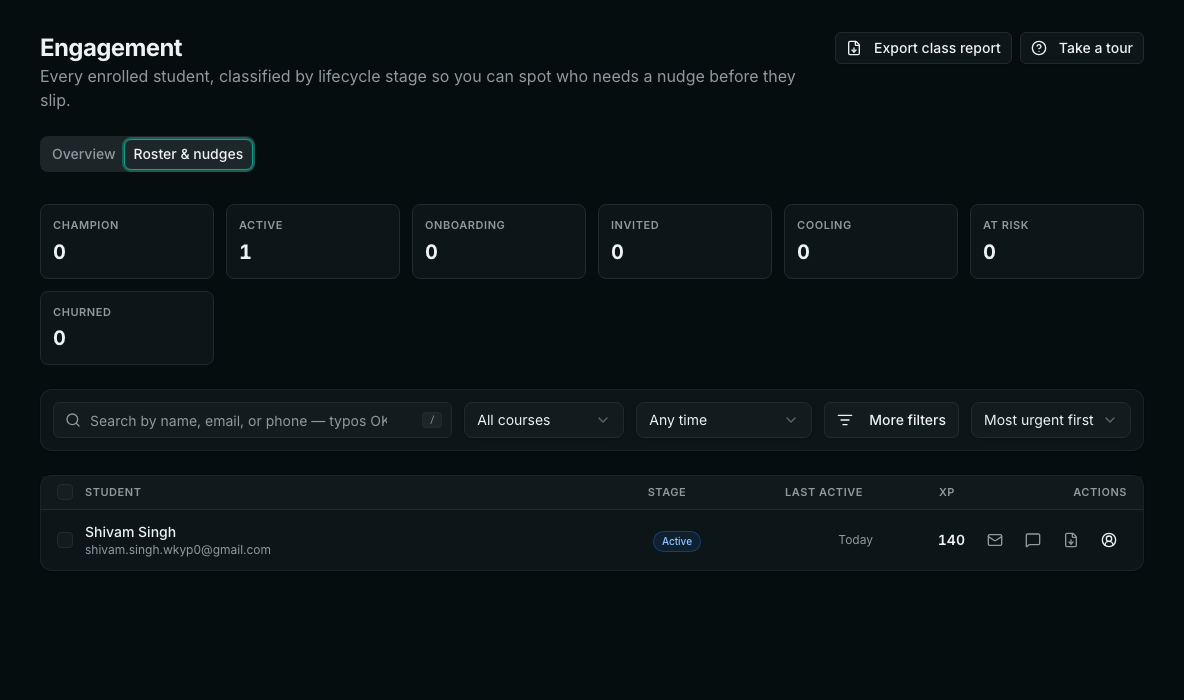
- Community access follows enrollment. Enroll in the course, join its community.
- Not available: time spent in the community, or who read which post.
7. Duplicate student or enrollment records
- Open Courses and click the course.
- Open the Students tab.
- Each student should be there once. If a person is there twice, compare the two emails.
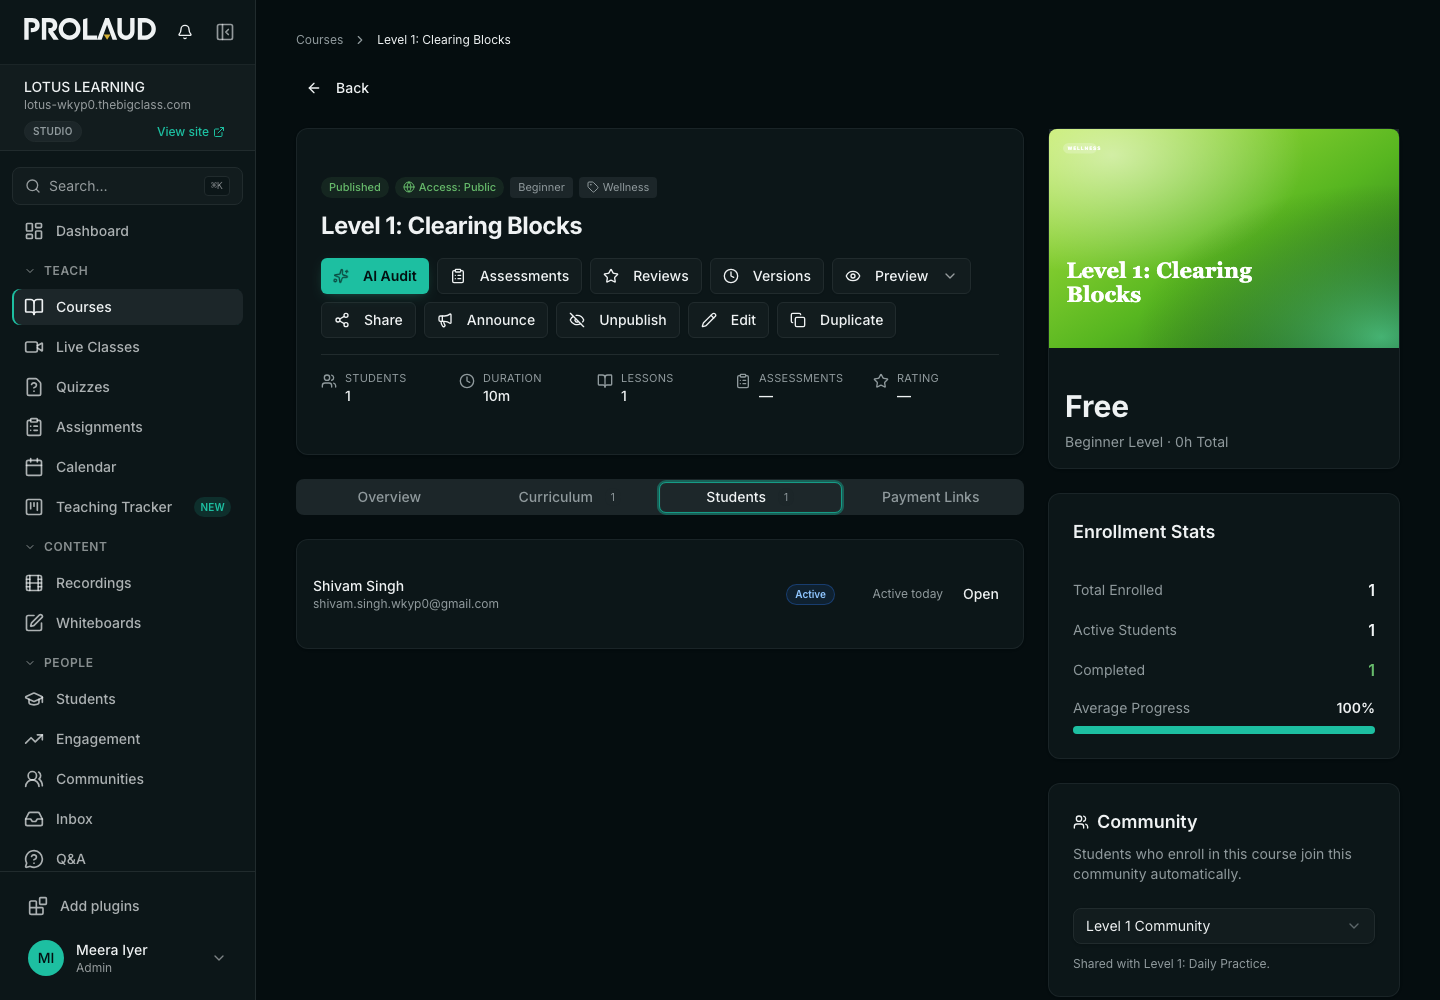
- A student has one enrollment per course, even if they enroll again from another device.
- Progress only moves forward. An older device cannot undo it.
- Two rows for one person means two emails. Ask them to use one.
- Not available: a button to merge two accounts.
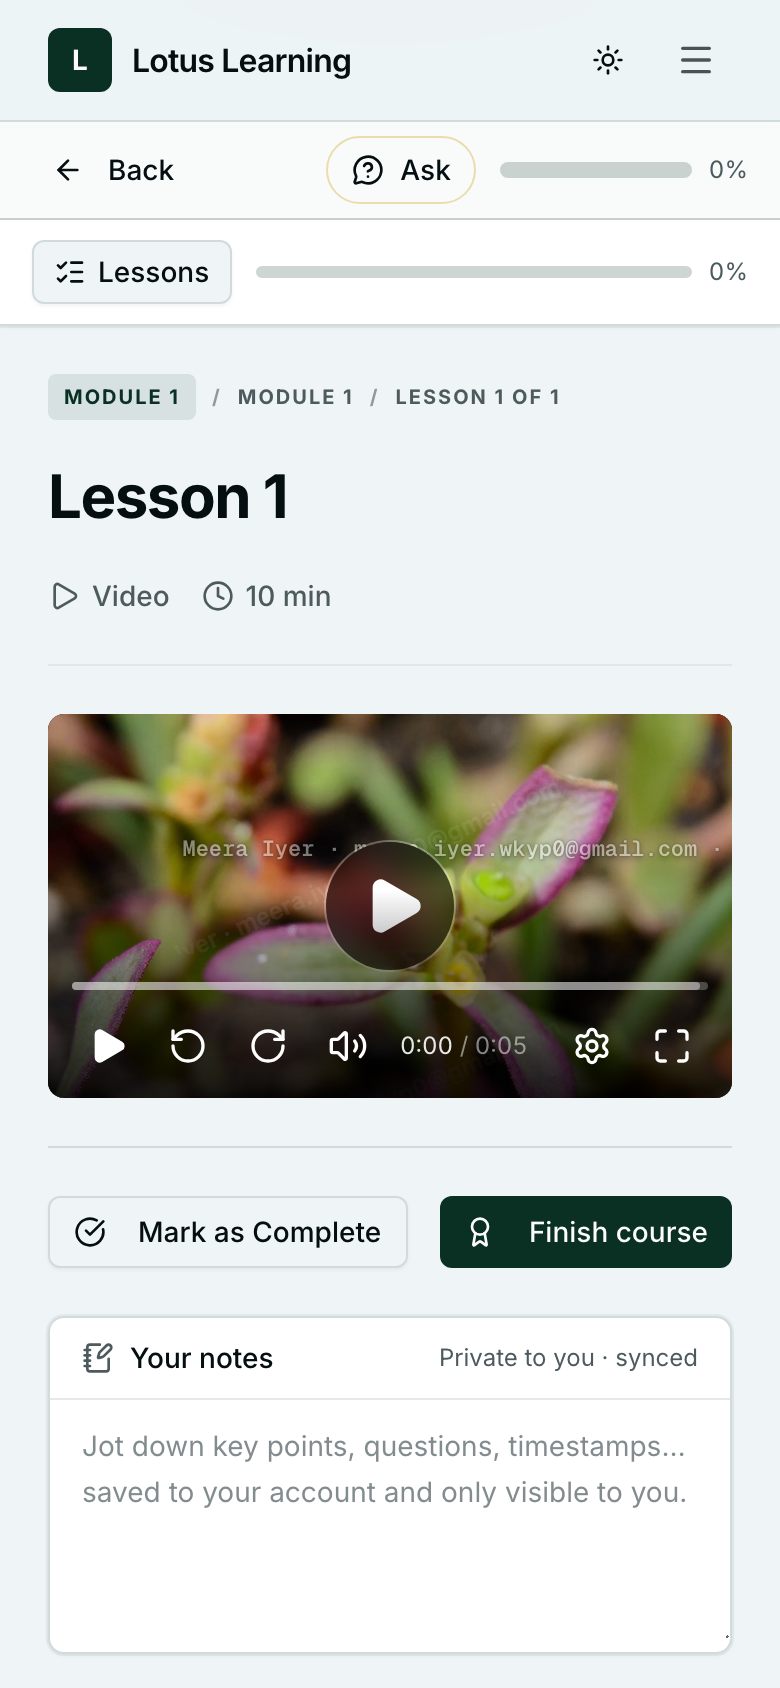
8. A video shows for me but not for the student
Check these in order:
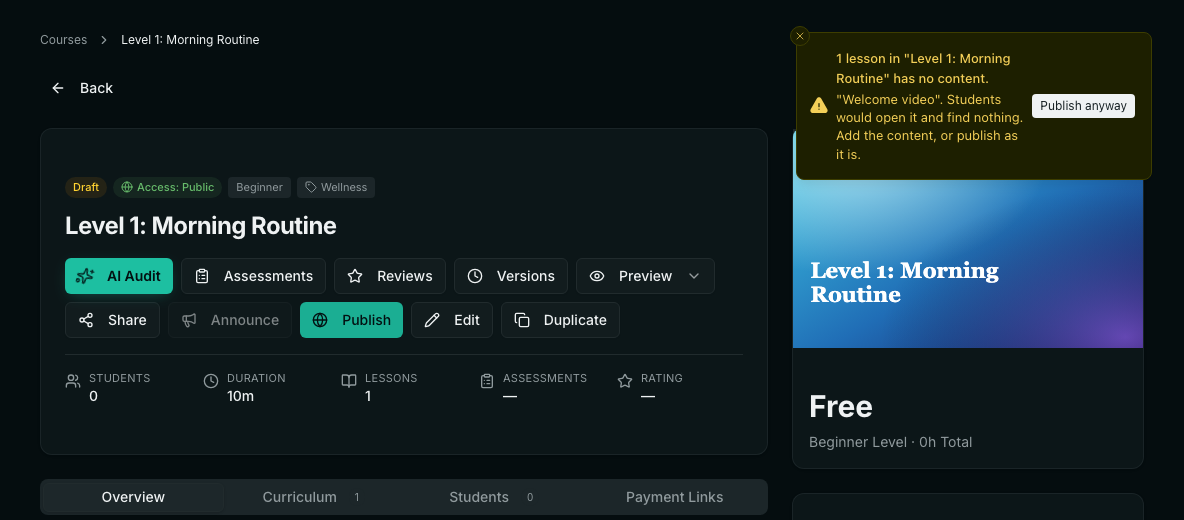
- Open the course. Is it marked Draft? Click Publish. Students never see drafts.
- Did a yellow notice say a lesson "has no content"? That lesson has no video saved. Add the video, then publish.
- Open the lesson again in the editor. Is the video still there? If not, the upload did not finish. Upload it again and wait for it to complete.
- Did you see "changed somewhere else since this page loaded"? Your edit was not saved. Click Reload and make the change again.
- Open Students. Is the student enrolled in this course, with the email they sign in with?
- Ask the student to refresh the page.
9. The live-class experience
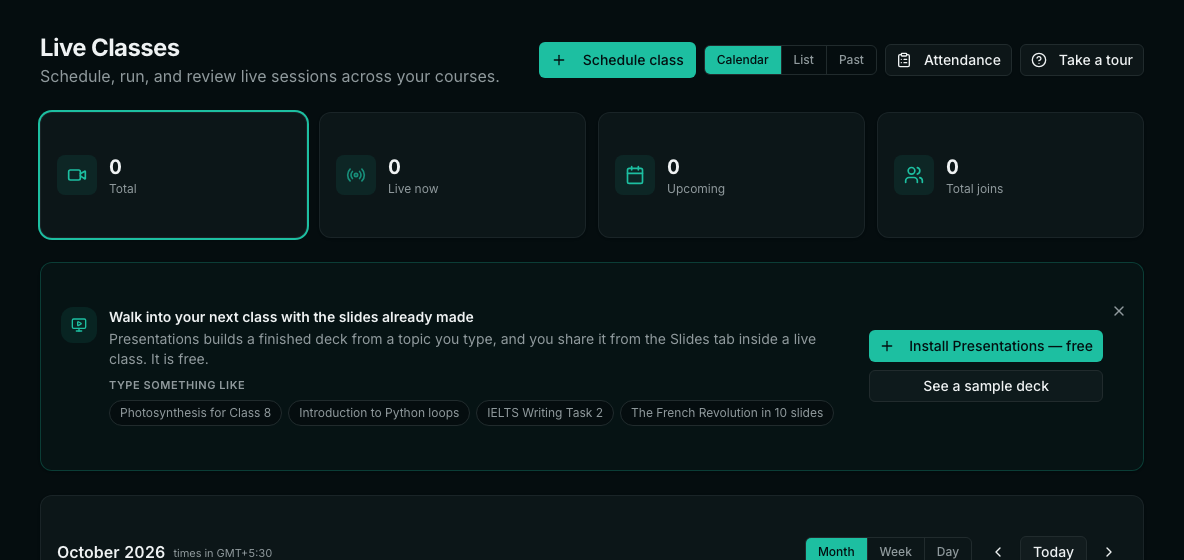
- You: open Live Classes, click Schedule class, fill the form and click Schedule & Notify.
- Student: gets the invite and reminders, and joins in the browser. Nothing to install.
- After class: open Live Classes and click Attendance. Export with CSV or PDF report.
- Student: finds the recording under Recordings.
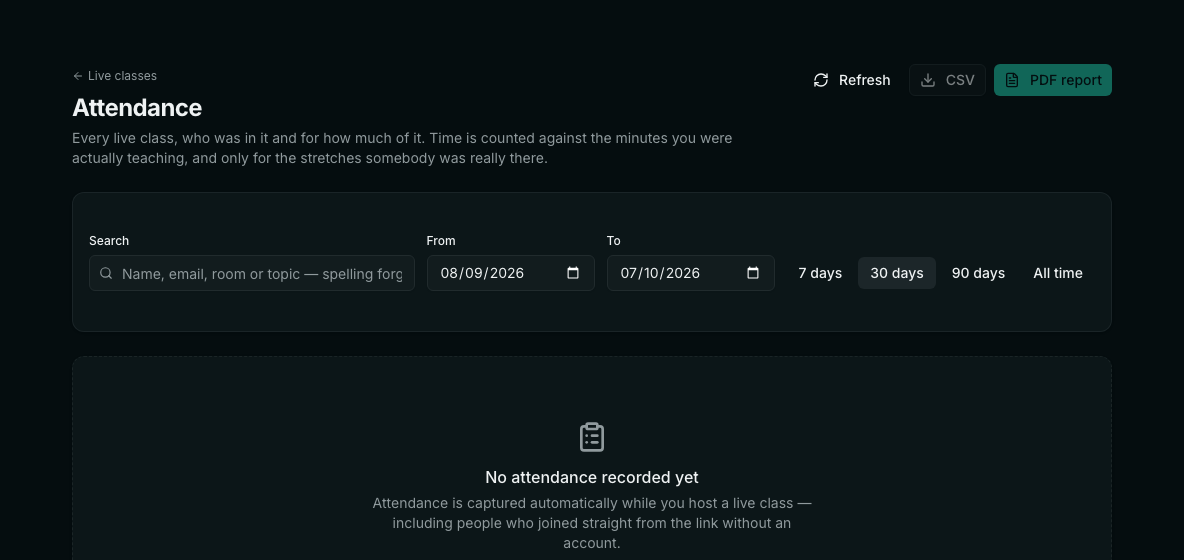
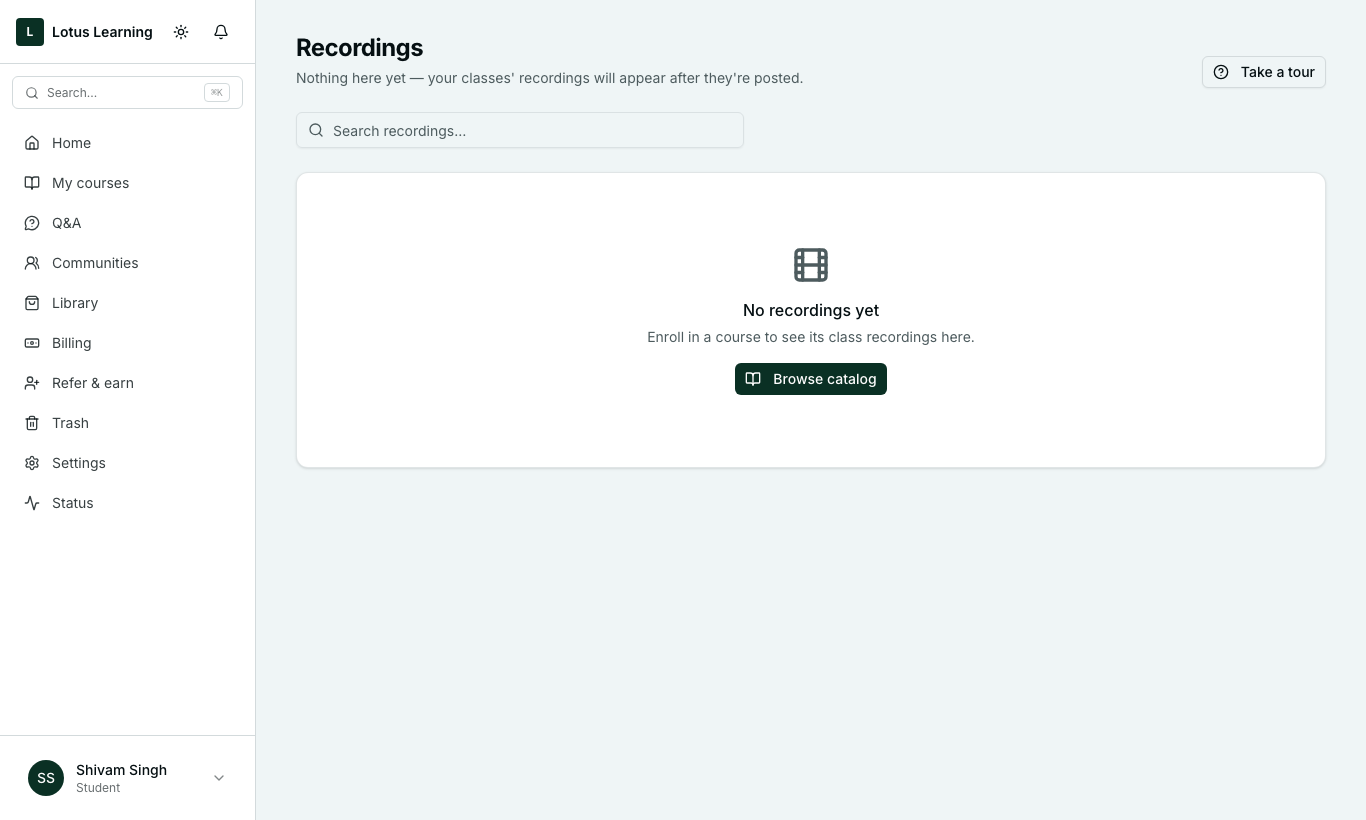
- You can paste a Zoom, Google Meet or Teams link instead. Then Prolaud does not capture attendance or the recording.
- Not available: a Prolaud app in the App Store or Play Store. It runs in the browser on phone and laptop.
10. One student's whole journey, for the admin
- Open Students.
- Click the student's name.
- Overview: their courses with progress, and the Community card.
- Activity: lessons, classes and posts in date order.
- Invoices: what they paid for.
- Messages: what you sent them.

11. WhatsApp, CRM and automation
- Open Marketing.
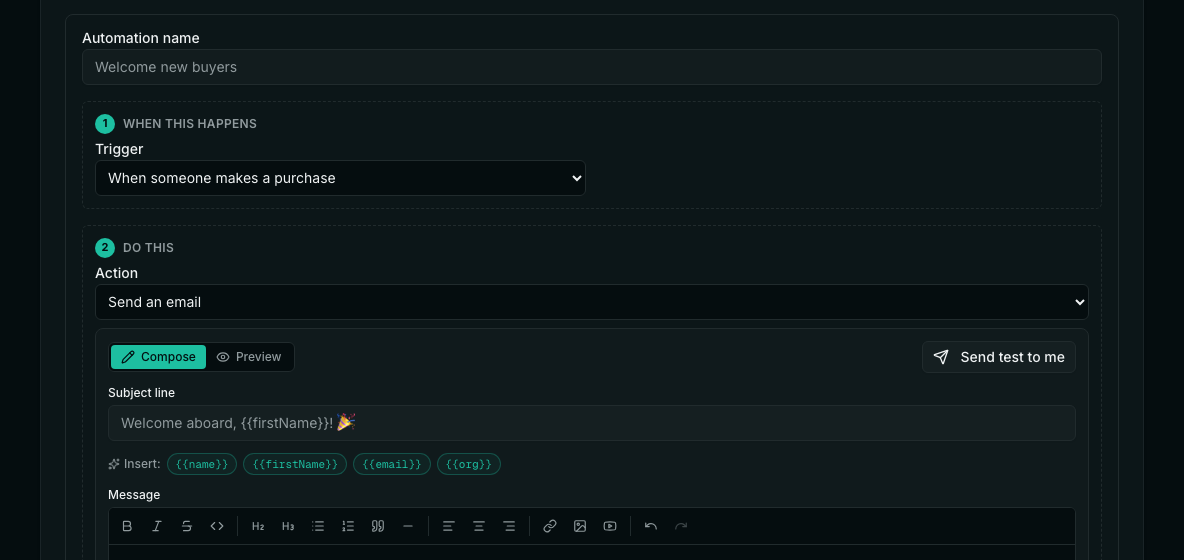
- Scroll to the automation builder and type a name.
- Under Trigger, choose When someone makes a purchase or When a contact gets a tag.
- Under Action, choose Send an email, Send a WhatsApp message or Add a tag.
- Write the message and create the automation.
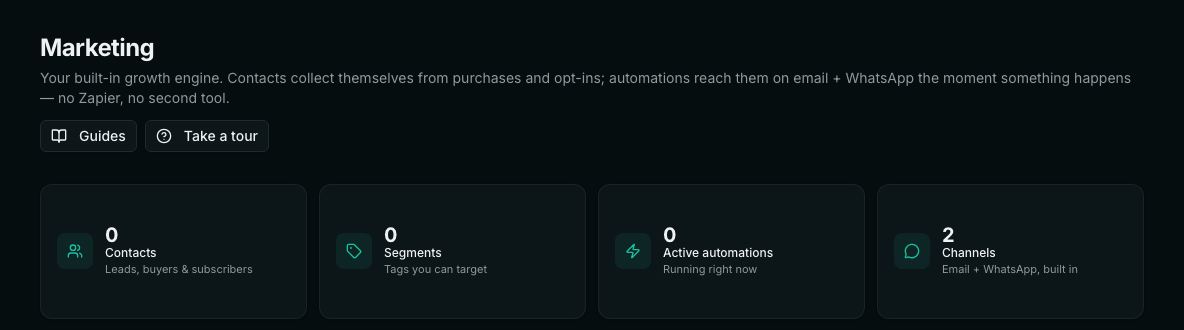
- Contacts: buyers and people who fill in a form on your site are saved here. You can tag them.
- An unpaid checkout gets the tag abandoned-checkout after about an hour, so a tag automation can follow up.
- On Engagement, a button tags the students you select as at-risk. It does not happen by itself.
- WhatsApp is on the Studio and Institute plans. Messages are sent from Prolaud's WhatsApp number.
- Not available: sending from your own WhatsApp number.
- Not available: triggers such as "finished a lesson" or "inactive for 7 days".
- Not available: a connection to an outside CRM, Zapier or Make.
- API and webhooks are on the Institute plan only.
12. Affiliates and referrals
- Not available: an affiliate or referral program for your courses. There are no partner links, commissions or payout reports.
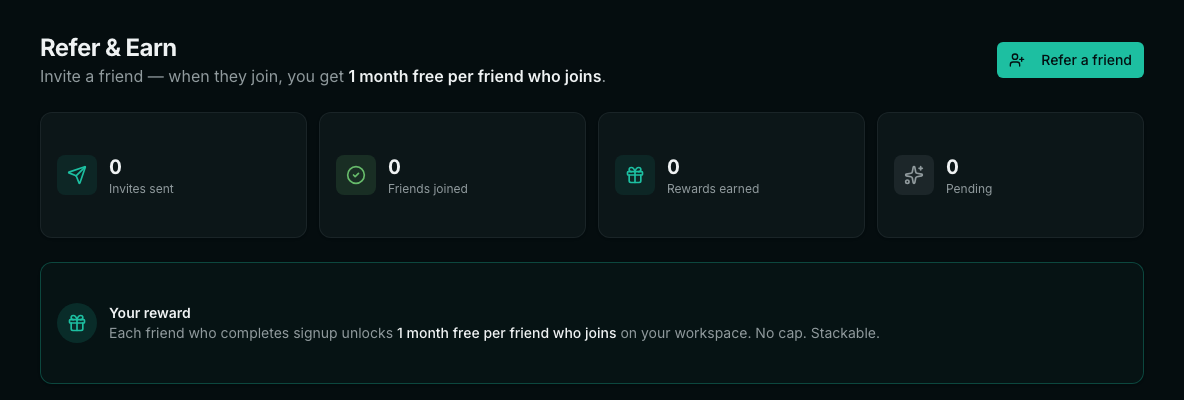
- Refer & Earn in your dashboard is Prolaud's own offer: invite another academy owner and get a free month.
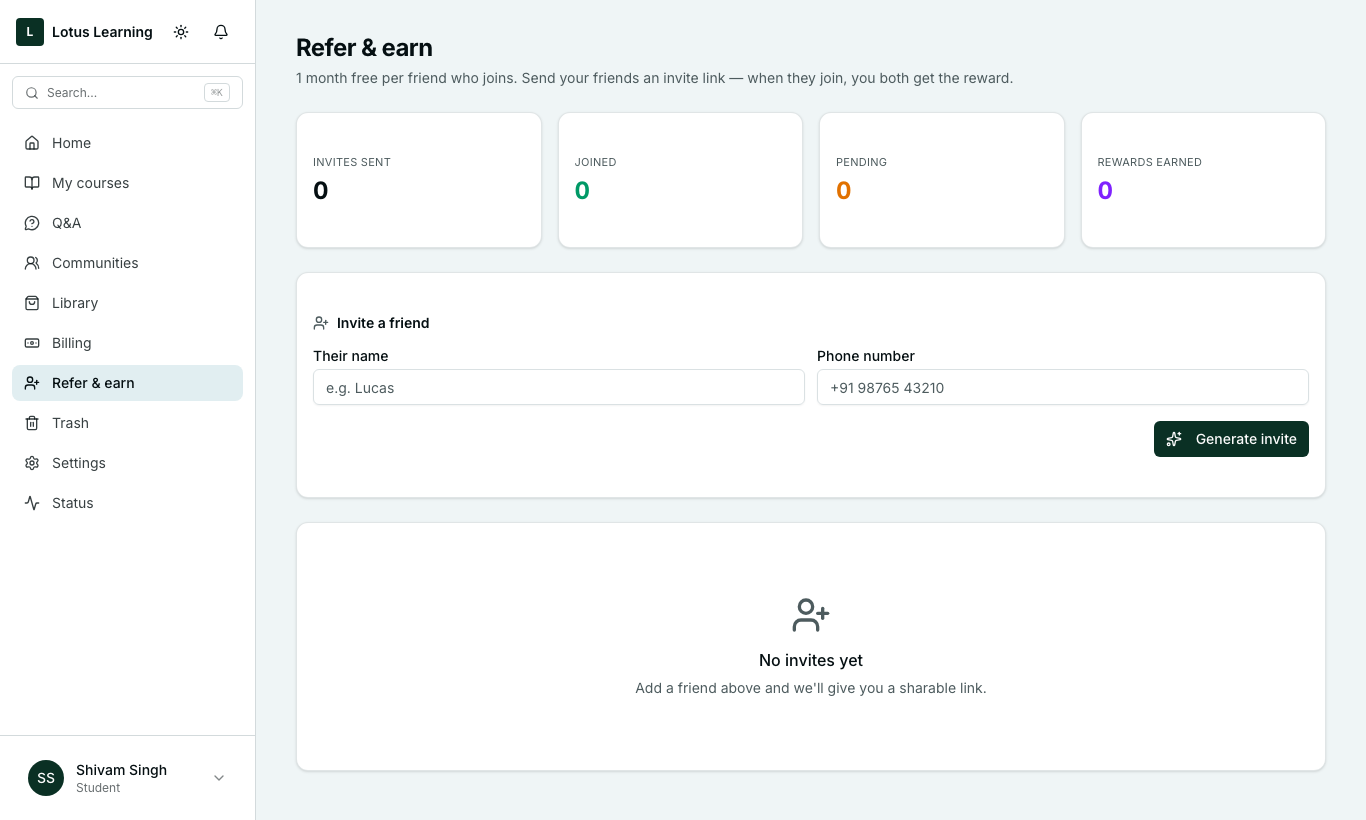
- Students also have a Refer & earn page. Its link opens Prolaud's sign-up page, not your course, and no reward is given to the student. Do not promise students a reward from it.
What you can do today is give each partner their own coupon:
- Open the course and click Edit.
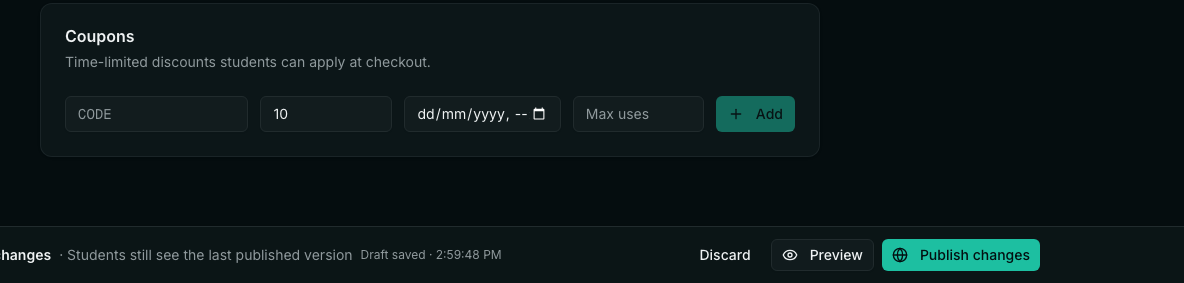
- Open the Pricing tab and find Coupons.
- Enter a code, the percent off, an end date and the maximum uses.
- Click Add, then Publish changes.
- Counting each partner's sales and paying them is done by you, outside Prolaud.
13. Branding, integrations and languages
- Open Public Site → Site settings.
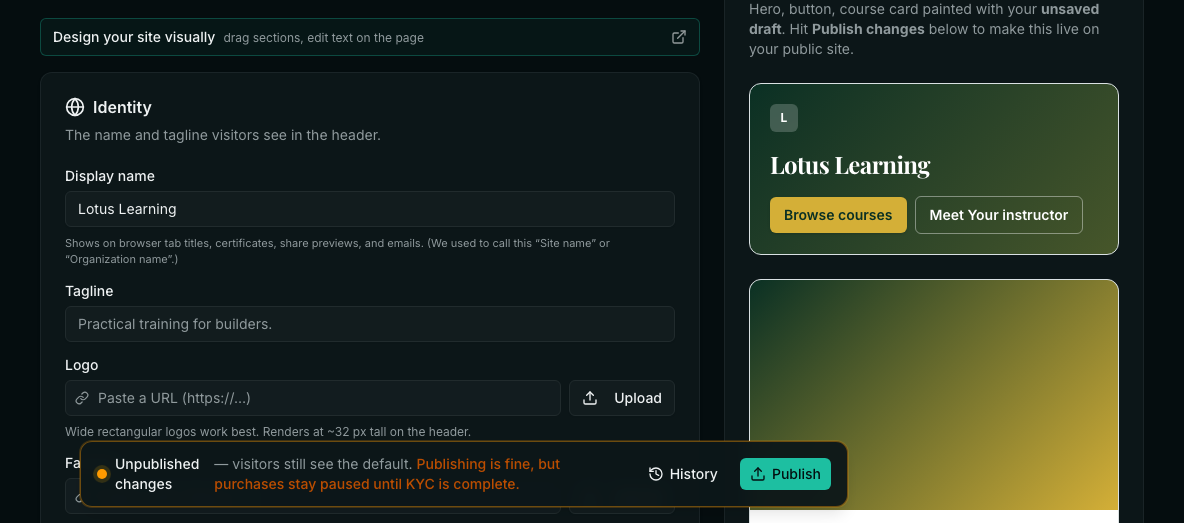
- Identity tab: set your display name, tagline and logo.
- Style tab: set your colors.
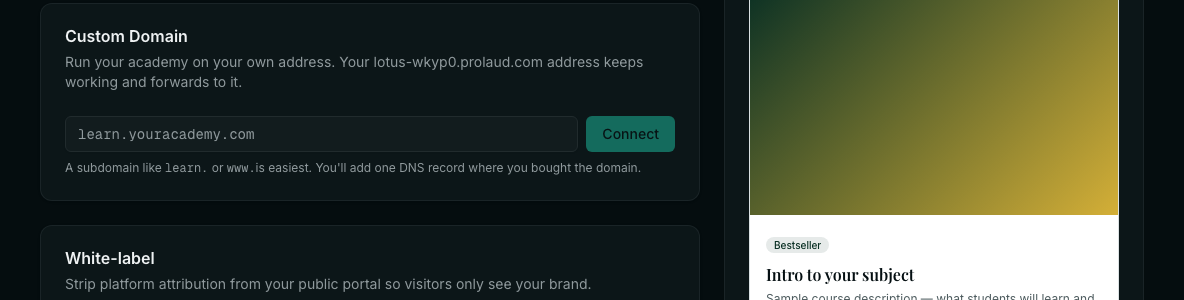
- Advanced tab → Custom Domain: type your address and click Connect.
- Advanced tab → White-label: tick Hide "Powered by Prolaud" in the footer.
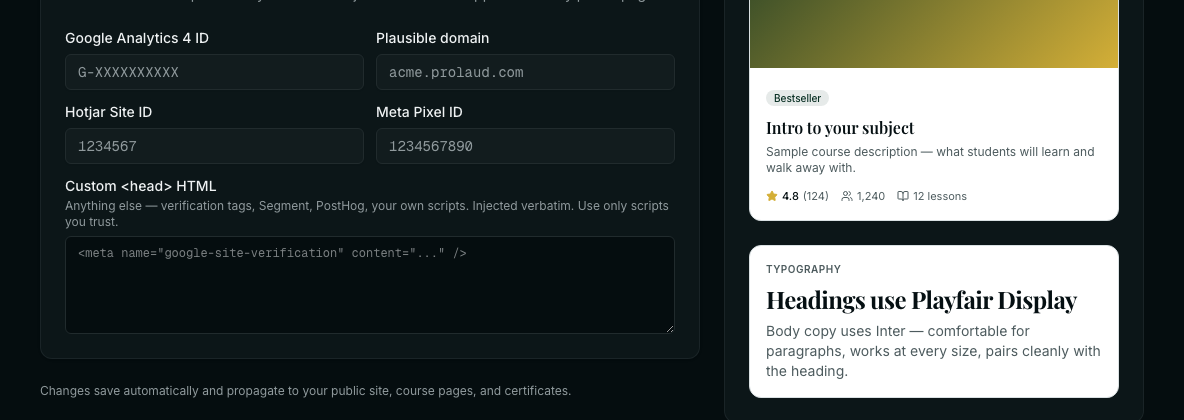
- Advanced tab → Analytics & tags: paste your Google Analytics 4, Plausible, Hotjar or Meta Pixel ID.
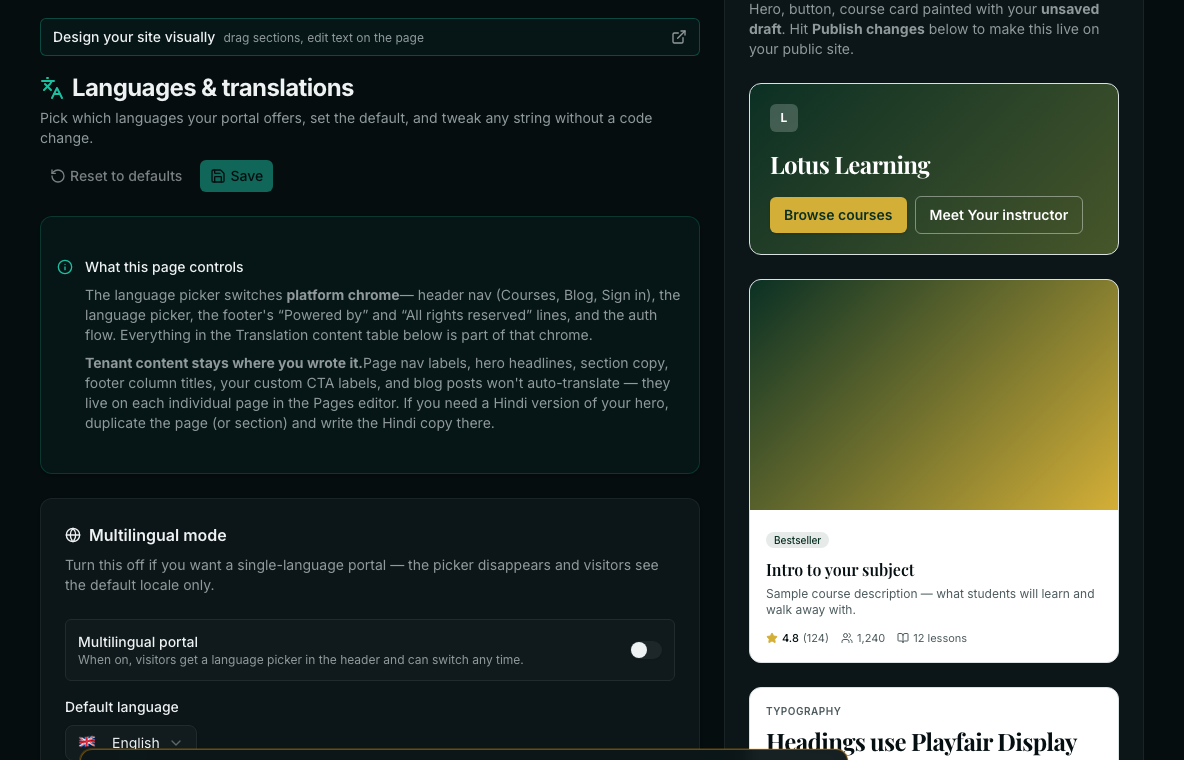
- Languages tab: switch on Multilingual portal and pick the languages.
- Click Publish.
- Custom domain, white-label and languages are on the Pro, Studio and Institute plans.
- Payments: Razorpay or Stripe.
- Zoom, Google Meet and Teams: by pasting the meeting link into a class.
- Languages: English, Spanish, French, Portuguese, Hindi, Bengali, Tamil, Telugu, Marathi, Gujarati, Kannada, Malayalam and Punjabi. Some are only partly translated.
- The picker translates the site menu, footer, sign-in and course catalog.
- Not translated: your own page text, your lessons, the learning area, checkout and emails. Write those in the language you want.
- Not available: Arabic and Bahasa Indonesia. They are listed as coming soon.
14. GST invoices
- Open Billing & plan and find GST & tax invoices. It shows for academies in India on a paid plan.
- Tick Issue GST tax invoices (I'm GST-registered).
- Enter your GSTIN, Legal / registered name, Registered address, State (place of supply) and GST rate (%).
- Tick My course prices already include GST if they do.
- If you sell abroad, add your LUT ARN and its validity date.
- Click Save GST settings.
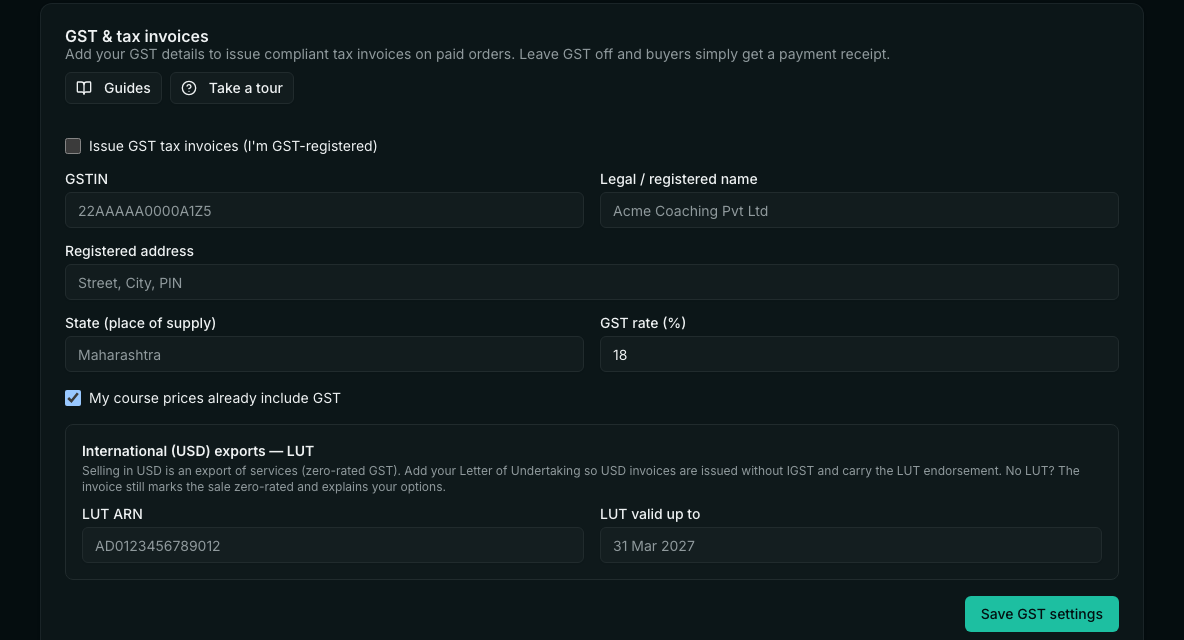
- The invoice shows your legal name, GSTIN, address and state. Checkout still shows your brand name.
- Invoices are numbered in order with no gaps, and restart each financial year.
- Tax is shown as CGST + SGST.
- Sales in other currencies get a zero-rated export invoice.
- With GST off, the buyer gets a plain payment receipt.
- Not available: IGST for buyers in another state. The buyer's state is not collected.
- Not available: the buyer's GSTIN, name or address on the invoice. There is no GSTIN box at checkout.
- Not available: GST invoices for Storefront products such as memberships and bundles. Those get a simple receipt.
- Ask your accountant to confirm this fits how you file.
15. Support
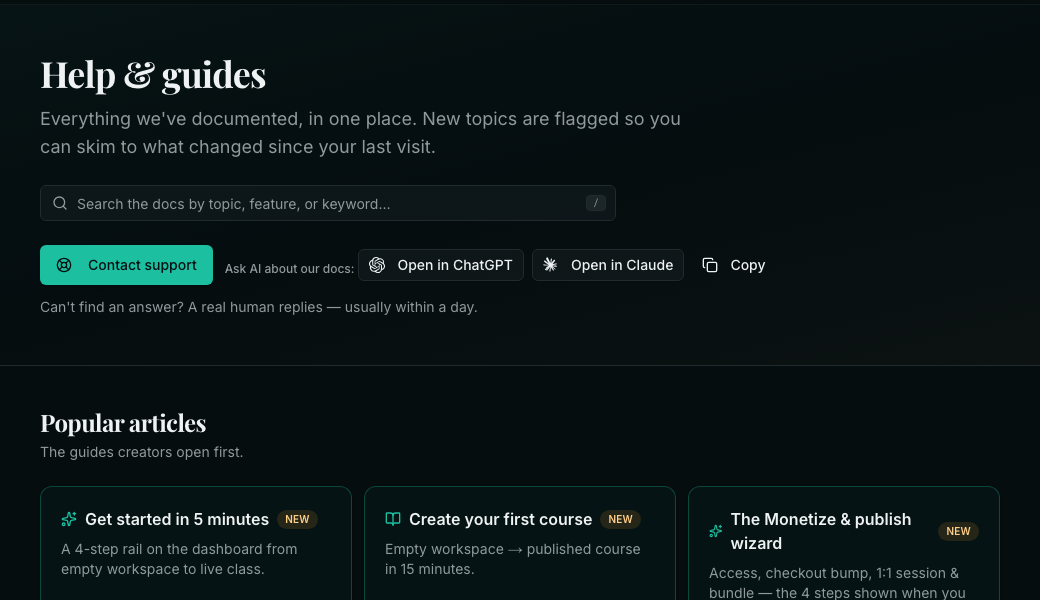
- Open the Help page.
- Click Contact support.
- Fill in your name, email, phone number, subject and message.
- Click Send message.
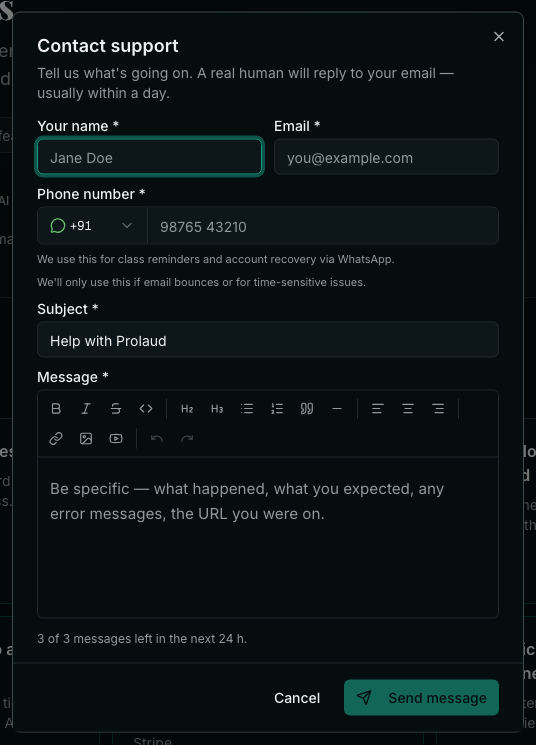
- A person replies to your email, usually within a day.
- You can send 3 messages in 24 hours from the form.
- Not available: live chat or a phone line.
- A 1-hour response time is offered on the Institute plan only.
Related